| Main Index Search Profile Send Private Check Private Who's Online FAQ Erase the Hive No Encryption Logout | ||||
| 2570 Registered Users | You have 0 new messages | |||
  New: Encrypted Connection! |
| Crystal Meth | Previous thread Forum index Threaded Next thread | ||
| Subject | PART 3 OF 6: LARGE-SCALE, OLD-SKOOL METH | Reply | ||
| Posted by | Dick_Fitzbetter (Hive Bee) | |||
| Posted on | 11-27-00 09:20 | |||
Manufacture of 1-phenyl-2-propanone (P2P) The manufacture of P2P utilizing benzaldehyde and nitroethane is described. We will be using a two-stage procedure involving the Cope modification of the Knoevengel reaction and an iron-acid reduction procedure. The chemistry of this procedure has been described by Uncle Fester in his Secrets of Methamphetamine Manufacture, 3rd ed., and we will concentrate on scaling up the reaction to the point where it can be used for very high-volume manufacture. Equipment The following equipment is required: • A rigid-base heating mantle with dual-element controls that holds a 22-liter round-bottom triple-neck. • A 22-liter, 3-neck, round-bottom reaction flask • A 45/50 to 24/40 glass fitting adapter • A Dean-Stark trap • Two 30cm West condensers • Several 5-liter and 20-liter plastic buckets • Fabricated equipment as described below Chemicals The following chemicals are required: • Benzaldehyde: This is our basic starting material. One mole of benzaldehyde weighs close to 100g and has a density close to 1g/ml. Since we will be performing 25-mole reactions, we will use 2500ml of benzaldehyde per reaction. All other reactant quantities are derived from this figure. Purchase the chlorine-free type if available, but the standard product works fine. Store in a cool, dark place. Benzaldehyde will auto-oxidize somewhat over time, but is nothing to worry about. This stuff will keep. The oxidation product is benzoic acid, which takes the form of well-defined white crystals at the bottom of the container. Try not to get any of the crystals into the reaction. They won't kill it, but will reduce the yield. Benzaldehyde has a strong odor of marzipan. It can be vacuum-distilled in order to clean it up, but has a tendency to bump vigorously at high vacuum levels. Benzaldehyde has been relatively easy to obtain until recently. • Nitroethane: This is the material we will react with the benzaldehyde molecule in order to produce 1-phenyl-2-nitropropene. It supplies the carbon sidechain and nitro group that are required to produce the nitrostyrene. EtNO2 is a clear, pleasant-smelling liquid which boils at 114-115 C, has a molecular weight of 75.07g/mol, and a relative density of 1.05. It distills nicely without vacuum. Since we will be providing a 5% excess of nitroethane in order to ensure there are enough molecules available to combine with the benzaldehyde, we will require 26.25 moles of nitroethane ((26.25mol x 75.07g/mol)/1.05), or 1,875ml for each batch. You can use the industrial grade nitroethane, but it must be washed and distilled before using. To clean it up, pour about 3000ml of nitroethane into a 4000ml separatory funnel, add 500ml of distilled water, shake thoroughly, allow the water to separate to the top over a 24-hour period, then drain the nitroethane and distill it, discarding anything that comes over below 110 C. It is important that the nitroethane be clean. You should be aware that nitroethane has become a highly suspicious product because it sounds much like nitromethane, which is the booster that was added to the Oklahoma City bomb. Do not confuse the two. • n-butylamine: This is our catalyst. Do not use "sec-" or "tert-" butylamine, as they will not work (the "n-" means "straight-chain"). In addition, because n-butylamine is a very strong base that reacts with carbon dioxide in the air and almost anything else it contacts, you must insure that the catalyst is clean. The best way to do this is to distill it. Do this inside a fume cabinet as this stuff is very ugly. Don't breathe it and don't touch it. You must wrap the stopper or cork on the distillation rig in Teflon tape to prevent it from being eaten. The amount of catalyst used in our 25-mole reaction is nominally 20ml/mole, but experience has shown that the actual amount is closer to 23ml/mole, so you should purchase an amount that will provide a volume of 25ml/mole of benzaldehyde. The actual amount must be determined by observation and adjusted accordingly. The use of unpure catalyst will result in a drastic reduction in yield. • Ferric Chloride (FeCl3): This innocuous chemical is used in our reduction reaction in small quantities as a "steerer", which modifies the reaction equilibrium in the direction we desire. A few kilos of this can do a lot of reactions. • Catalytic Iron Powder (Fe): Used in the reduction procedure, the iron reacts with hydrochloric acid to produce hydrogen gas. Due to the requirement for good dispersion during the reduction, the use of a fine mesh powder is necessary, either 80 or 100 mesh. A coarser 60 mesh powder can be used, but may result in some problems if the stirring system is inadequate. The reaction requires 200g of iron powder for every mole of 1-phenyl-2-nitropropene reduced. Since we will be performing 20-mole reductions, each reduction will require 4000g of iron. • Muriatic Acid: This is simply dilute hydrochloric acid, usually about 28-32% as compared with 37% HCl. It works just fine, however, and has the advantage of being available at almost any hardware store. A volume of 750ml of 37% HCl is required for every mole of 1-phenyl-2-nitropropene that is reduced, resulting in 15 liters of acid required for every 20-mole reduction. It has been my experience that the more dilute muriatic acid performs just as well as the stronger stuff in the same volume. • Methanol: This is used as a solvent when processing the yellow nitropropene crystals. Purchase methanol which has not been diluted with water. Keep it in the deep freeze. • Toluene: This is our solvent for the Knoevengel reaction. It is available in every paint store, although many companies are relabeling their solvents with house names so the narcs don't hassle them. Use the "UN" number, which must be on every container, to identify the product. Or just ask. Most paint store employees don't know the difference between toluene and neoprene, and will happily tell you anything you want. Our Knoevengel reaction requires 200ml of toluene for every mole of benzaldehyde, or 5000ml for every reaction. Production of 1-Phenyl-2-Nitropropene Set up the 22-liter RB in the heating mantle. Add 10-20 PTFE (Teflon) boiling stones to the vessel. Through the wide center neck, add 5000ml of toluene, 2500ml of benzaldehyde, and 1875ml of nitroethane, in that order, with stirring. Have the fitting reducer, Dean-Stark trap, and a West condenser greased up and assembled nearby. You will need to assemble the pieces quickly once the n-butylamine is added. Using a wooden dowling rod as a stirrer, quickly add 550ml of n-butylamine with stirring. The reaction mixture will turn from clear to a milky consistency as a Schiff's base and a molecule of water are formed (the water turns the solution milky). Assemble the fitting reducer, the Dean-Stark trap, and the West condenser on top of each other and plug the two side necks. Attach a fitting to the top of the condenser and run an exhaust line into your fume cabinet. Start the water running through the condenser. Wrap some aluminum foil around the top half of the reaction vessel and the Dean-Stark trap to avoid excessive cooling. Turn on both heating elements and set the temperature controls at 20%. At this setting it will take a long time to heat up the solution. After you have some experience with this reaction, you can start out with the heating mantle at a higher setting (70% for 20min on my rig). One must be aware that we are using only a small West condenser for cooling and that it takes very little extra heat to blow material out the top. On my equipment, the proper setting is 18%. 20% is too hot. Be very careful with the heat. The idea here is to boil the solution just hard enough to reach the bottom of the condenser where the water-toluene azeotrope can condense out into the Dean-Stark trap and be removed from the reaction solution. This occurs at 85 C. Once the reaction reaches the condenser, the water will begin to accumulate rapidly. For a 25 mole reaction, 25 moles of water will be created and must be removed for the reaction to reach completion. My Dean-Stark trap holds 25ml of water, resulting in a total of 18 full water-traps to complete a 25-mole reaction. Use a piece of paper and make a mark every time the trap is emptied. The water will come over rapidly at first, taking only a few minutes to fill the trap, and then slows down as water molecules get harder to find. The reaction should take about five hours to complete, but you should not use time as a definitive indicator. You will do much better at judging the quality and state of your reaction by observing the color of the reaction mixture. As water is removed, the solution will begin to turn a light orange color and deepen as the reaction nears completion. The use of too much catalyst, n-butylamine, will cause the reaction to polymerize to some degree, resulting in a dark brown solution color, poor quality nitropropene crystals, and a greatly reduced yield. Unfortunately, this reaction is very sensitive to the quantity and quality of the catalyst. Too little catalyst will reduce the yield significantly and too much will burn (polymerize) it. I advise that you do test batches of 1 and 5 moles in order to home in on the exact amount of n-butylamine required. If the reaction is allowed to continue once all the water is removed, it will begin to polymerize, so you should carefully watch the color of the reaction solution and keep careful track of the amount of water removed. Even if all of the theoretical amount of water has not been removed, if the solution color starts turning dark, pull it. Turn off the heat, allow the boiling to subside into the vessel, remove the condenser and Dean-Stark trap, then carefully lift the vessel out of the heating mantle and place it on a plastic bucket inside the fume cabinet. Leave it to cool down to room temperature overnight. We will now strip the toluene solvent from the solution by performing a vacuum distillation. You need a high-volume adjustable vacuum source in order to perform this distillation. Do not use a vacuum pump to strip solvents; its hard on the pump and poses a high fire hazard. Always use an aspirator when vacuum-distilling solvents. Your typical university aspirator that runs off 40psi of water pressure is not adequate to pull a decent vacuum in a large volume, let alone an adjustable vacuum. We will be working with a system volume of about 27 liters. Attach two West condensers in series and support them carefully with tri-grips or wooden blocks with grooves cut into the tops. Attach a 5000ml round-bottom flask that has been marked at the 5000ml level. We will use this mark to determine when we have finished. Once completely assembled, turn on the heating mantle and set the controls at 30%. Once again, your system/equipment will be slightly different from mine and you must make some minor adjustments. The idea here is to distill off the toluene at a temperature high enough to allow the condenser to liquefy the toluene so it doesn't get sucked into the vacuum system where it can cause damage. About 26-27" Hg or thereabouts will produce a distillation temperature range of about 40-60 C, which is hot enough to be condensed out by water at 10 C. You should not attempt to distill off the toluene at a normal atmosphere because the added heat quickly polymerizes the product as the toluene is removed. You must also make sure you’ve removed ALL of the toluene; even a small amount will prevent the crystals from forming or will produce poor quality crystals that polymerize rapidly in the open air. Since we started with 5000ml of toluene, we need to strip off at least that much. Use a mark on the receiver. Once the toluene has been stripped off, turn off the heat, disassemble the equipment, and then pour the hot, orange liquid remaining in the vessel into two 5-liter plastic buckets, filling each of them to about 1/3 full and then covering. Quickly rinse and wash the big reaction vessel with methanol before the residue adheres to the walls. Let the liquid nitropropene cool for a few hours, then cover and place at the bottom of the freezer overnight. In the morning, the crystals will be formed and you must remove any unreacted material and contaminants. To accomplish this, pour about one liter of methanol which has been frozen for a week or two into one of the buckets holding the solid mass of crystal, and break up the mass with a big screwdriver. The yellow nitropropene crystals are only slightly soluble in cold methanol, but the undesireable reaction remnants are very soluble, so this will dissolve the gunk while leaving the crystals intact. Once converted into a slurry, filter through a Buchner. Do the same to the other bucket. Empty the bright yellow crystals into a large cake tray and let them dry. Once dry, place into a 5gal bucket, cover, and place in the deep freeze. Left in the open air, the nitropropene crystals will polymerize in about one month. Stored in the freezer, these crystals will keep nicely for at least two years. The yield on this reaction is not 100%, as stated in other literature. The theoretical yield is 79%, but the best I have achieved is 74%, with 70% being the average. Since one mole of 1-phenyl-2-nitropropene weighs 168g, you should end up with 25 moles x .7, or 17.5 moles of nitropropene crystals which weigh about 2940g. I advise that you make and store all of these yellow nitropropene crystals before proceeding to the next step. You may wish to experiment with other strong bases in order to find an alternative to n-butylamine, which is rare enough to be a choke point. Reduction of 1-Phenyl-2-Nitropropene to 1-Phenyl-2-Propanone Equipment Construction: This procedure is the most difficult described. Not because the reaction is difficult to perform, but because the equipment you must build in order to make it workable. The problem is one of scale: A two-mole reduction can be performed in 5000ml glassware using a heating mantle and standard stirring equipment. To reduce a 20-mole batch requires ten times the volume, 50 liters, a controllable heat source, and scaled-up stirring equipment. Additionally, we will perform a steam-distillation in order to extract and purify the final product, which requires a large condenser. We want this condenser to also operate in the reflux mode during the reaction in order to keep the acid from boiling off and killing everything. To make matters worse, we will be working with 15 liters of muriatic acid, which means everything must be made of stainless-steel. Fortunately, this equipment is neither difficult nor expensive to construct. You need to either own and be proficient with a TIG welder, or find a shop that can do the work. If you must use shops, spread the work around. They will all ask what it's for. Simply tell them that you have a non-disclosure agreement and would lose your job or contract if you told them. Or make up your own story. Our reaction vessel will be a 50-liter stainless stock-pot found at the kitchen/restaurant supply. It must be stainless, and not aluminum. High-quality stainless pots have aluminum-clad bottoms for better heat transfer. This is good. They will all be fabricated of thin-wall stainless, but look for the most heavy-duty pot you can find. This pot is the weak point in your equipment because the boiling hydrochloric acid will eat through the wall of the pot in 5-7 reactions, after which a new pot must be purchased. In order to seal the pot, a flange must be welded onto the pot rim and provisions made for attaching and sealing a top. This is done by carefully measuring the diameter of the pot rim and fabricating a flange to fit. 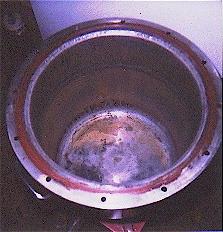 .jpg) We will be using a 3/16" polypropylene "O" ring for a seal and a series of bolts on the outside to accomplish the sealing and attaching. The ring should be about 2" wide, with the bolts (3/8" stainless hardware) on the outside and a 1/16" x 3/16" groove machined into the flange face about ¾" from the inside rim. Polypropylene O-ring material can be found at most good hydraulics shops and machine shops. We will be using 1/8" diameter or 3/16" diameter O-ring material, whichever is available. Buy enough for several rings, as they wear out. Our flange must also be flat to within 1/16" so the top doesn't warp. Do not weld the flange to the pot until the top-plate has been fabricated. We also have a requirement for knowing the temperature of the reaction at all times. In order to do this, you must either weld a stainless bushing into the side of the pot that fits an industrial thermometer, or create a fitting in the top through which you can insert a thermometer long enough to reach the reaction solution. Good luck finding a thermometer that long. I chose the bushing-in-the-side method with mixed results. The temperature indication worked great but the boiling acid eats the thermometers, and the bushing weld creates a weak point which the acid attacks and eats through after only three reactions. Covering the weld completely with fast-drying J-B Weld after each use doubled the lifespan of the pot to six reactions. I'm sure someone out there can think of something better. A Teflon-coated pot would be nice. Now that we have the beginnings of a reaction vessel, we need a heat source. Fortunately, you can find propane-powered barbeques almost anywhere. A 30lb propane tank is good for about three reactions. Now we must design our top-plate, which is fairly complex. The first step is to have a matching circle of 3/16" thick stainless-steel cut and drilled to fit the flange so they can be bolted together. Next, we must provide for a Teflon bearing in the middle. I designed a bearing machined from 3" Teflon round stock. Since the gearmotor used to turn the stirrer has a ½" driveshaft, the bearing consisted of a 1/2" hole in the middle and a 3/4" wide outside shoulder machined down to 1/2" depth. This results in a 1/2" thick bushing wall, which has held up without problem. Using these dimensions, a center-hole of 1.5" diameter and four 10-32 threaded holes on the outside rim are required. It is advisable to have the Teflon bushing machined first and then fitted to the top. A shaft clearance of 0.003-5 works well. Unfortunately, you must know the diameter of the motor driveshaft in order to design the bearing. Many motors have 5/8" driveshafts which will operate perfectly with the above bushing design by simply enlarging the center hole, leaving a 3/8" bushing wall. The stirring shaft should be standard 316 stainless round stock with a flat surface machined at one end to make attaching the vanes easy. .jpg) .jpg) The importance of vigorous stirring cannot be over-emphasized. If too much iron remains on the bottom, it can cause a runaway reaction, which you will regret. To avoid this, keep the iron in suspension and the reactants moving. I have determined experimentally that about 150 rpm is a good speed for stirring, but this can vary depending upon the effectiveness of the stirring vanes. The vanes on the reaction vessel shown were a simple plate welded onto the bottom of the shaft, after making sure that it did not contact the thermometer shaft inserted through the pot wall. Now that we have a bearing and driveshaft, we must design a bracket that will hold our gearmotor firmly in line with the bearing and driveshaft. The picture above shows the gearmotor without the bracket, as the unit has been disassembled for storage. You are left to your own devices regarding bracket design, since there is little chance that your gearmotor will be exactly like mine. Since there are two more attachments which must be placed on the top cover, you should locate an adequate gearmotor early on in the design and then wait until the end to fit the motor and bracket. The motor should have a shaft speed of about 150 rpm and a torque of 32 inch-pounds or better, keeping in mind that the more reaction mixture being turned, the more torque is required. A 2" stainless nipple must be welded to the top plate to accommodate the condenser and its fittings. In addition, a threaded 1/4" hole must be placed in a location near the outside of the top plate. A 1/4" NPT stainless nipple screws in here and is attached to 5/16 Tygon tubing leading to the acid reservoir. This is where the acid enters the reaction vessel. The condenser and its fittings are fairly straightforward. Four 5' sections of 1/2" thinwall stainless tubing are grouped within a 2" diameter circle and welded into a flat flange with outside boltholes. Use 1/2" bolts for strength and a thick rubber gasket. The outside water jacket is 4" thinwall truck exhaust tubing which is light and cheap. It is fitted with 1/4" NPT bushings at each end for water circulation. It is sealed at the end with another flange, leaving 6-9" of tubing sticking out the end. The waterjacket should be 4' long. Use dishwasher hoses found at the hardware store that have 1/4" NPT thread on one end and hose thread on the other for circulating water through the system. The condenser will need to be supported with chains due to its weight when full of water. In order to use the condenser in both distillation and reflux modes, another flange must be fabricated which can be moved around in combination with standard pipe fittings. A combination of 2" stainless "T" , a 2" plug, and a 6" long nipple with an angled flange of about 20 degrees on the end works well. The adapter flange must also mate well with the condenser flange to avoid leaks. .jpg) .jpg) .jpg) The following diagrams show how the condenser is configured for both distillation and reflux modes: .jpg) .jpg) A container to hold and dispense the muriatic acid is required. I use a small (5gal) plastic garbage can with a Tygon tubing siphon hole drilled just above the acid line. A 1/8" stainless-steel flow valve is required to control the flow of acid into the reaction. These valves may be found at industrial supply houses like W.W. Grainger. You should use only Tygon tubing as most other types will soon harden and crack. Iron Reduction of 1-Phenyl-2-Nitropropene to 1-Phenyl-2-Propanone Pour 15 liters of clean tap water into the vessel. Follow this with 4000g of catalytic iron, 3400g (20mol) of 1-phenyl-2-nitropropene, and 40-50g of ferric chloride. Assemble the top with the condenser in the reflux mode, start your water running through the condenser, begin stirring, and fire up the propane burner. Watch the thermometer and turn off the heat when the temperature reaches 90 C. Slowly add muriatic acid in small doses over a 2-hour period. Watch the top of the condenser for signs that things are getting out of hand. This reaction needs to be performed in a small shed or other outbuilding with good ventilation. Install a heavy-duty (500+cfm) exhaust fan in the shed. The reason for this is that the fumes from this reaction are very corrosive and if the reaction goes into runaway mode, you will want to abandon the shed for awhile as the fumes clear out. A total of 15 liters of muriatic acid are added. Once all of the acid is added, allow the stirring to continue for another 2 hours before going on to the next step. We now must extract our P2P from the nasty black mess inside the reaction vessel using steam distillation. Disconnect the condenser, flange, and "Tee", leaving the 2" nipple open. The stirrer should remain turning. Next, quickly pour in about 4 liters of saturated lye solution that has cooled off overnight. Some heat and steam will be generated as the lye neutralizes the muriatic acid. Assemble the Tee, flange, and condenser in the distillation mode and start the water flowing through the condenser. Place a 20 liter bucket under the end and fire up the propane burner to high. Discontinue stirring. Distill over the water and P2P until the bucket is full, then turn off the heat. The yield for this reduction is 75%. No matter how badly you think you’ve blown it, you should expect to obtain 15 moles, or a little over 2000g of P2P. Since P2P has a density close to that of water, this works out to about 2 liters of product. We must now extract the P2P from the water, purify it, and store it for later use. This is accomplished by pouring 3000ml of water/P2P into each of two 4000ml separatory funnels. You then add about 300ml of saturated lye solution to each and shake vigorously for 3-5 minutes. This is done to insure there is no residual acid which can, and will, poison the catalyst when used. After a thorough shaking, 400ml of methylene chloride is added to each separatory funnel and shaken vigorously for 2-3 minutes. Methylene chloride is an easily obtainable solvent for most plastics. Check the plastics supply shops that sell buckets, sheet plastic, etc. Since methylene chloride is heavier than water, it will pick up the P2P and carry it to the bottom of the sep funnel. This takes some time, however, so don’t hurry. I allow it to separate for 6 hours before draining the bottom layer into a one-gallon wine bottle, or even better, an amber glass bottle. Cut a square out of a plastic baggie and use it for a seal between the bottle-top and the cap. Add another 400ml of methylene chloride, shake vigorously, and let it settle out again for 6 hours before draining. This is good enough, so go on to the next batch. When finished, you should have 3-4 gallons of methylene chloride/P2P solution. We will now recover our methylene chloride solvent for reuse and distill the P2P. Use a 5000ml round-bottom vessel and distill over the methylene chloride from 39 to 60 C. Return the solvent to its container and continue until there is only about 2000ml of P2P left in the vessel. Add boiling stones and vacuum distill over the remnants of the methylene chloride and water until it’s clear that only P2P is left. Using a clean receiver and fresh boiling stones, distill over the P2P at 105-115 C. Do not distill at a temperature lower than 105 C, or the P2P will carry contaminants over with it, the contaminants being darker colored. .jpg) P2P is a clear, pale-yellow liquid that smells like cat piss. P2P will auto-oxidize over a period of weeks if left at room temperature, so put it in the freezer until ready for use. You can use toluene to extract the P2P from the water, but it must be vacuum distilled, and the separation will be to the top instead of at the bottom like with methylene chloride. It takes about the same amount of time to separate as with methylene chloride. Alternative Reduction Procedure For those unable or unwilling to construct the admittedly large number of mechanical items described above, there is an alternative reduction procedure that you may or may not find more convenient. This reduction, gleaned from Dr. Alexander Shulgin's book PIKHAL, uses glacial acetic acid instead of muriatic acid to create hydrogen by reacting with catalytic iron. It also cleans up with water and eliminates the steam distillation step used above. The downside is that, as described, it takes a much larger volume of acid to reduce an equivalent amount of nitropropene. It may be possible to reduce the amount of acid required, but I leave it those interested to develop it further. Place a 1000ml Pyrex beaker into a pan of water and rest this on a hotplate. Add 140ml of glacial acetic acid and 32g of 80-100 mesh catalytic iron. Heat to about 85C, just below the point where white salts begin to appear, then add 10-15g of 1-phenyl-2-nitropropene crystals dissolved in 75ml of glacial acetic acid. Add slowly, allowing a vigorous reaction that is free from excessive frothing. Continue heating for 1.5 hours after the addition. The surface will crust up, turn whitish, and climb the walls of the beaker. Remove from heat and mix into 2000ml of clean water. Add enough concentrated lye solution to neutralize the acid, then extract with methylene chloride and distill exactly as above. You can scale this up by using a bucket made from polypropylene (try Chevron Delo 400 oil buckets). These tough buckets will stand up to 100 C temperatures without deforming. Or you can use a stainless pot, either plain or Teflon-coated. Glacial acetic acid has a strong vinegar smell which disperses rapidly when heated, creating an odor problem that is hard to disguise. But since there is no power required, you can do this out in the woods somewhere. This procedure was designed by Dr. Shulgin to reduce the nitrostyrene associated with MDMA, so it can be used for both Meth and Ecstasy (if you can find a supply of piperonal). You will find that most of the procedures I’ve described can apply to the manufacture of both products. I’ve tried this procedure with excellent results, obtaining a 75% yield of a very pure and colorless P2P. ô¿ô |
||||