When it comes to heating a reaction usually it is best to have an oil bath with regulated heating. This avoids hot spots and uneven heating of the flask as well allows for a better temperature regulation and the dissipation of heat which is especially important with exothermic reactions. Temperatures of 160°C or more can be used in an appropriate mineral oil. Also, maybe most importantly, such a setup allows for a magnetic stirrer to be easily employed.
Nowadays, magnetic stirrers usually already have a heating plate but they are quite expensive. Simple magnetic stirrers can be constructed from old walkmans, by using its parts: a strong magnet glued to the wheel with the elastic band connected to the electromotor which can bee regulated by a potentiometer connected on the walkmans’ electromotor rotation regulation circuit, all appropriately build in a box and feed trough an electrical adapter. It cost only a few hours of work and can make you feel more confident in further success if it works well.
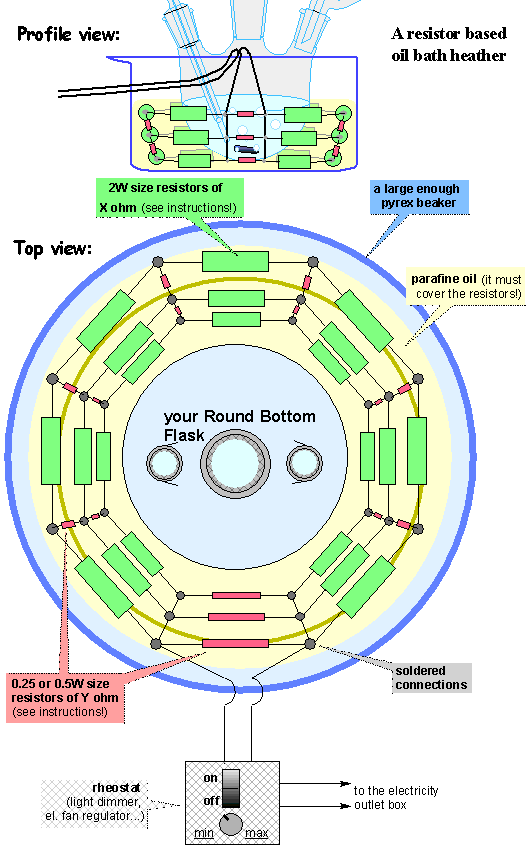
An oil bath can be heated by simple 150 to 300W submersible water heaters which are quite cheap, though not always easily accessible. However they are quite cumbersome to use in shallow oil bath, take a lot of its space, have to be fixed on the bath somehow and the worst is that they heat the oil much more on one side than the opposite. This last problem can be circumvented by putting a stirring magnet in the oil but this magnet interferes with the one in the flask making it impossible to mix in some setups. Another problem is also that they are built for water which transfers heat considerably more rapidly than oil. Therefore the temperature at the surface of the heater coil gets higher forming more of that nasty burned paraffin smell at the full power.Instructions too build a simple heater for an oil bathI will here describe an effective and simple heating setup that works great for me. It can bee built for less than 3$ (rheostat not included). It shows relatively good temperature stability which depends a little on the external T, but is even in the worst case +/- 5°C the set T. It is so simple that with the given (way too detailed) instructions you need nothing more than the elementary school electro-technical knowledge. All you will need is ~40 resistors which cost ~8 cents/piece or less where I live. They are then linked and soldered together just like shown in the schemes. Like with any other setup without a thermostat, you will also need a rheostat to regulate from 0W to the max power. Present-day rheostats are electrical circuits using a semiconductor called triak (or thyristor) to chop off the waves of the alternating current until a certain time phase. This way they regulate the power output, for example, of an electrical bulb connected at it (or our heater). They can be easily built if one has some basic knowledge of electronics, but it is easier and less time consuming to simply buy it. The switch with a light dimmer incorporated is technically a rheostat and is most practical for our use (check its max working power when buying to get an appropriate one). Use an el. box to build it inside so you won’t have the deadly el. wires exposed! Connect the el. wires on it exactly like described on its instructions (or shown on its back) with the only difference that instead of the light bulb you will have a heater connected.
The resistance and max power of the resistors can be calculated very simply. For a small oil bath (for up to 150ml flasks) a power of 75 to 100W is just enough for up to 160°C. For a large water bath (500ml flasks) 300W should do. Better not exaggerate on the power needed.
The heater uses
n circularly linked resistors in two, three or more circles (on the scheme: 7 green resistors in three circles). The electricity passes trough these parallel circles with the voltage drop on each resistor being
U/
n (where U is the voltage of the electricity in you country: 110V in the US; 220V in Europe). The red resistors have only supporting function, keeping the contraption together and make it hard to bend and deform. Therefore, their resistance should be very high while their nominal power should be low in order of not being too big and cumbersome. Use 1/4W or 1/2W nominal power and Y>47,000ohm resistors for 110V or Y>100,000ohm for 220V.
The green resistors will conduct the current and will therefore heat considerably. It is easy to calculate which type we need. Let us assume that we need an oil bath for a 150ml flask (
P=75W) and we want to have 3 circles on a 220V network (
k=3,
U=220V). To get the number
n we will assume that the width of the heather needed for the flask is ~9cm. We want the resistors to bee ~3.5cm apart so the circle will require a polygon made by 9cm*pi/3.5cm=~8 resistors. The red resistors connecting the el. supply wires together must be for structural support only, therefore
n=(9cm*pi/3.5cm) - 1=7. Each circle will consume
P/3=75W/3=25W so each resistor will have to dissipate
P/(3*7)=3.6W. Resistors have their nominal power declared for dissipating heat in the air and to the circuit board they are ordinarily soldered on (the bigger they are more power can they dissipate). The dissipation when submerged in oil is surely much more efficient, let’s say about two times more efficient. It follows that we need resistors with the nominal power of 1 or 2W. The power equation is
P=
U2/
R therefore the resistance
X=(
U2*
k)/(
P*
n)=276.6 ohm. The nearest standard is a 270 ohm resistor and recalculating back we can see this little change won’t affect much the max power of the heater (it will make it 78W).
The wires connecting the three circles with the electric source must be isolated with a thermally stable isolation to avoid accident hazards! Varnished 1-2mm copper wires like the ones used in electromagnetic coils and transformators are ideal – their transparent and thin isolation is surprisingly tough, resistant to both heath and oil and they can be easily bended to get them elegantly over the edge of the beaker where they can are connected with a normal isolated double el. wire. Remove the isolation by scratching the wire with a knife, but only at those points where they will be soldered! For extra safety the small ceramic rings used as insulation for heat exposed wires can bee put on these copper wires (can be obtained out of the old stoves). Before switching on for the first time, better use an ohm-meter (a resistance measuring instrument) to make sure you got everything soldered correctly (it should show
n*
X/
k=630 ohms, +/– 20 ohm).
For a 0 to 75W heater like drawn on this scheme we need:
21×resistor: 270 ohm, 2 W power dissipation(or 1 W if you can’t get these)
15×resistor: 100,000 ohm (=100 kiloohm), 0.25 W power dissipation
2×15cm of 1 to 2mm varnished copper wire for transformators
~1m of normal 2-wire cable
- Rheostat – a light dimmer in an el. box (the Pmax should be >100W, which is true for just about any)
- an el. power connector
(all can be obtained in any hobby electronics store)You will also need a soldering equipment and ~10cm of soldering wire.
 Warnings:
Don't use it in water or other conductive liquids!
Don't use it unless fully submerged in the oil!
Beware, the electricity can kill. Don't touch!
Don't use electricity (switches, connectors etc.) in the presence of explosive solvents!

