Author Topic: How to wire a DIY heating mantle?  (Read 10158 times)

0 Members and 1 Guest are viewing this topic.

DRIVEN

  • Guest
How to wire a DIY heating mantle?
« on: May 30, 2004, 08:46:00 AM »
Swid was wondering if any bee interested in lending some advice regarding the wiring of a DIY heating mantle.  From what swid has read, it is important to know how the nichrome wire gauge and length relates to its resistance. Electrical is not swids strength and was wondering how to wire this mantle such that it’s temperature can be regulated in a practical range.

Following lugh’s design

Post 403446 (missing)

(lugh: "DIY OTC Heating Mantles", Chemicals & Equipment)
, a mantle (250ml RBF) was constructed with Portland cement/diatomaceous earth.  Embedded in the mantle is a non coiled, 2.9 ft., AWG 30 nichrome wire which had been harvested from a hair dryer.

The controller being used is a ceiling fan speed controller (max 5 AMP, 120V).  The mantle is to be powered from a standard wall electrical outlet (120V).  Below is a summary of all the information gathered.  Information gained from tables from a nichrome wire website is indicated by an astrix

Length of wire: 2.9ft (35”, 90cm)
AWG: 30 (0.25mm diameter)
*Required Amps to heat straight oxidized wire to 205 deg C: 0.92 Amps
*Required Amps to heat straight oxidized wire to 982 deg C: 3.3 Amps
*Resistance for AWG 30: 6.5 ohms/ft (assuming NiCrA)
*Total resistance for 2.9ft wire: 18.9 ohms (2.9 X 6.5ohms/ft)
*Given hot ohms for this wire is 18.9, then amps are 6.09 and watts are 700.

A quick test was done where a 2ft length of the 30 AWG wire was hooked up to the aforementioned fan speed controller which was powered by a standard electrical wall outlet.  When the controller was turned onto the lowest setting the wire quickly glowed red and broke! (perhaps not surprising to you electrical savy bees).  Will a resistor of some sort have to be employed?

Any help is much appreciated.

Driven :)


Nicodem

  • Guest
Recalculate
« Reply #1 on: May 30, 2004, 10:48:00 AM »
May I ask how do you expect 90cm of thin wire being able to carry 750W of power!?
If you want a heater regulated from 0 to 300W (which should bee just fine), you need the length of wire that will have 50 ohm resistance (calculated for 120V). That would bee ~19 feet for your wire. But you better use an ohm-meter and measure the resistance. Don’t just “assume” it is 6.5 ohm/ft!
And still I doubt 19ft of wire can radiate 300W of heat without burning out. You would better connect parallely two wires of 100 ohm each so that each will bee twice as long and radiate 150W each. That will make reduce the power/ft to 1/4 and you will still have 300W altogether without burning the wire.

Edit: If you have no clues about electricity I should remind you that the wires must not get in touch with each other when built into the concrete. Otherwise the short circuit will reduce resistance and cause them to burn.


_mu_

  • Guest
May I ask how do you expect 90cm of thin wire...
« Reply #2 on: May 30, 2004, 04:03:00 PM »

May I ask how do you expect 90cm of thin wire being able to carry 750W of power!?


Duh, by cooling it with the things you want to heat up :-).

Seriously, you might want to start looking for ways that enable you to give the best heat transport from your wire to the thing you want to get warmed up.
 

And you also want a variable current supply.

Nicodem

  • Guest
Building a heater made from resistors
« Reply #3 on: May 30, 2004, 09:06:00 PM »
When it comes to heating a reaction usually it is best to have an oil bath with regulated heating. This avoids hot spots and uneven heating of the flask as well allows for a better temperature regulation and the dissipation of heat which is especially important with exothermic reactions. Temperatures of 160°C or more can be used in an appropriate mineral oil. Also, maybe most importantly, such a setup allows for a magnetic stirrer to be easily employed.
Nowadays, magnetic stirrers usually already have a heating plate but they are quite expensive. Simple magnetic stirrers can be constructed from old walkmans, by using its parts: a strong magnet glued to the wheel with the elastic band connected to the electromotor which can bee regulated by a potentiometer connected on the walkmans’ electromotor rotation regulation circuit, all appropriately build in a box and feed trough an electrical adapter. It cost only a few hours of work and can make you feel more confident in further success if it works well.
An oil bath can be heated by simple 150 to 300W submersible water heaters which are quite cheap, though not always easily accessible. However they are quite cumbersome to use in shallow oil bath, take a lot of its space, have to be fixed on the bath somehow and the worst is that they heat the oil much more on one side than the opposite. This last problem can be circumvented by putting a stirring magnet in the oil but this magnet interferes with the one in the flask making it impossible to mix in some setups. Another problem is also that they are built for water which transfers heat considerably more rapidly than oil. Therefore the temperature at the surface of the heater coil gets higher forming more of that nasty burned paraffin smell at the full power.


Instructions too build a simple heater for an oil bath

I will here describe an effective and simple heating setup that works great for me. It can bee built for less than 3$ (rheostat not included). It shows relatively good temperature stability which depends a little on the external T, but is even in the worst case +/- 5°C the set T. It is so simple that with the given (way too detailed) instructions you need nothing more than the elementary school electro-technical knowledge. All you will need is ~40 resistors which cost ~8 cents/piece or less where I live. They are then linked and soldered together just like shown in the schemes. Like with any other setup without a thermostat, you will also need a rheostat to regulate from 0W to the max power. Present-day rheostats are electrical circuits using a semiconductor called triak (or thyristor) to chop off the waves of the alternating current until a certain time phase. This way they regulate the power output, for example, of an electrical bulb connected at it (or our heater). They can be easily built if one has some basic knowledge of electronics, but it is easier and less time consuming to simply buy it. The switch with a light dimmer incorporated is technically a rheostat and is most practical for our use (check its max working power when buying to get an appropriate one). Use an el. box to build it inside so you won’t have the deadly el. wires exposed! Connect the el. wires on it exactly like described on its instructions (or shown on its back) with the only difference that instead of the light bulb you will have a heater connected.
The resistance and max power of the resistors can be calculated very simply. For a small oil bath (for up to 150ml flasks) a power of 75 to 100W is just enough for up to 160°C. For a large water bath (500ml flasks) 300W should do. Better not exaggerate on the power needed.
The heater uses n circularly linked resistors in two, three or more circles (on the scheme: 7 green resistors in three circles). The electricity passes trough these parallel circles with the voltage drop on each resistor being U/n (where U is the voltage of the electricity in you country: 110V in the US; 220V in Europe). The red resistors have only supporting function, keeping the contraption together and make it hard to bend and deform. Therefore, their resistance should be very high while their nominal power should be low in order of not being too big and cumbersome. Use 1/4W or 1/2W nominal power and Y>47,000ohm resistors for 110V or Y>100,000ohm for 220V.
The green resistors will conduct the current and will therefore heat considerably. It is easy to calculate which type we need. Let us assume that we need an oil bath for a 150ml flask (P=75W) and we want to have 3 circles on a 220V network (k=3, U=220V). To get the number n we will assume that the width of the heather needed for the flask is ~9cm. We want the resistors to bee ~3.5cm apart so the circle will require a polygon made by 9cm*pi/3.5cm=~8 resistors. The red resistors connecting the el. supply wires together must be for structural support only, therefore n=(9cm*pi/3.5cm) - 1=7. Each circle will consume P/3=75W/3=25W so each resistor will have to dissipate P/(3*7)=3.6W. Resistors have their nominal power declared for dissipating heat in the air and to the circuit board they are ordinarily soldered on (the bigger they are more power can they dissipate). The dissipation when submerged in oil is surely much more efficient, let’s say about two times more efficient. It follows that we need resistors with the nominal power of 1 or 2W. The power equation is P=U2/R therefore the resistance X=(U2*k)/( P*n)=276.6 ohm. The nearest standard is a 270 ohm resistor and recalculating back we can see this little change won’t affect much the max power of the heater (it will make it 78W).
The wires connecting the three circles with the electric source must be isolated with a thermally stable isolation to avoid accident hazards! Varnished 1-2mm copper wires like the ones used in electromagnetic coils and transformators are ideal – their transparent and thin isolation is surprisingly tough, resistant to both heath and oil and they can be easily bended to get them elegantly over the edge of the beaker where they can are connected with a normal isolated double el. wire. Remove the isolation by scratching the wire with a knife, but only at those points where they will be soldered! For extra safety the small ceramic rings used as insulation for heat exposed wires can bee put on these copper wires (can be obtained out of the old stoves). Before switching on for the first time, better use an ohm-meter (a resistance measuring instrument) to make sure you got everything soldered correctly (it should show n* X/k=630 ohms, +/– 20 ohm).

For a 0 to 75W heater like drawn on this scheme we need:
21×resistor: 270 ohm, 2 W power dissipation(or 1 W if you can’t get these)
15×resistor: 100,000 ohm (=100 kiloohm), 0.25 W power dissipation
2×15cm of 1 to 2mm varnished copper wire for transformators
~1m of normal 2-wire cable
- Rheostat – a light dimmer in an el. box (the Pmax should be >100W, which is true for just about any)
- an el. power connector
(all can be obtained in any hobby electronics store)

You will also need a soldering equipment and ~10cm of soldering wire.


Warnings:
Don't use it in water or other conductive liquids!
Don't use it unless fully submerged in the oil!
Beware, the electricity can kill. Don't touch!
Don't use electricity (switches, connectors etc.) in the presence of explosive solvents!


xxxxx

  • Guest
hotplate from kmart $9.99
« Reply #4 on: May 31, 2004, 04:54:00 PM »
i would go to kmart and buy a one burner hotplate with an adjustable temperature dial for $9.99. plus when you are not using it in the lab you can even use it to cook food too!

Nicodem

  • Guest
A hotplate?
« Reply #5 on: May 31, 2004, 07:41:00 PM »
How ingenious. Of course I use a hotplate for the usual reflux reactions. But can you come with an idea of how to use a hotplate with a magnetic stirrer?
Not all reactions are run at reflux and many require stirring. The submersible water heater is also simply too cumbersome to use for already said reasons. That's why I built the thing described above. It's as simple as it can get and very efficient.


xxxxx

  • Guest
some thoughts
« Reply #6 on: June 01, 2004, 04:34:00 PM »
i have been thinking about that. one thing would be like stated above magnet on ceiling fan motor or dc motor with speed control. another thing which is on my mind is in elementary school we saw a movie demonstrating how an armature in an electric motor turns. an egg shaped magnet was placed in concave dish and the copper coils of an electric motor was placed around the dish. when current was passed through the coils the magnet began to spin. i really don't understand the principal behind this but if someone else did maybe they could use it to make the stir bar turn with an electricaly generated magnetic field instead of a magnet?

calcium

  • Guest
Used Heating Mantles...
« Reply #7 on: June 01, 2004, 09:18:00 PM »
Used Heating Mantles can be had for short money at your favorite auction site.

Why risk building something which may fail during a reaction?

Soft heating mantles make life very easy. They work on your magnetic stirrer.

You'd probably spend as much on a home made 'mantle' as on a good, used one.

Just my two cents.

Sredni_Vashtar

  • Guest
Electromagnetic stirrer
« Reply #8 on: June 01, 2004, 11:24:00 PM »
xxxxx: Electromagnetic stirrers like you say are available but expensive. Lots of electronics to generate a rotating magnetic field. I doubt you would get enough magnetic moment from motor windings held some distance from the stir-bar.

Nicodem's design is cheap but fucking dangerous. You'd want to run it off an isolation transformer at the very least.


DRIVEN

  • Guest
D agrees with Calcium.
« Reply #9 on: June 02, 2004, 03:10:00 AM »
D agrees with Calcium.  IMO it makes more sence to purchase a used/new mantle than to make one (at least in the manner indicated in the initial post). Especially when considering the cost, time and hassle of making a mantle and the resultant risk that comes with the product. D is no expert but 2hrs were spent gathering the components, 5hrs to put it together (getting the wire to set right is time consuming and finicky), with about 35$ material costs. In the end the mantle cracked as it dried and D remembers looking at the damn thing and thinking that it wasn't worth trusting nor the anxiety that comes along with being unconfident with the product. 

On the other hand, it was a shit load of fun to make, especially the sculpting part! Also, in the end D learned a lot about electricity and nichrome wire.

There seems to be many ways to skin a cat.  This bee is going to stick with the hotplate/stirrer and oil bath option.

Nicodem: whoa dude, your diagrams are tight!

Driven :)


bio

  • Guest
home made
« Reply #10 on: June 02, 2004, 04:02:00 AM »
Simple magnetic stirrers can be constructed from old walkmans, by using its parts: a strong magnet glued to the ........

Very clever Nicodem I hope you won the science fair. All kidding aside as an old EE I often thought of your scheme but the high ohm struts never occured to me. In the old days these were called suicide cords but I think the nayser who posted missed the magnet wire sentence. My old cup heaters work quite well with a fancy home built SCR rig (2 paralled for fun) but I really  got a good laugh from the opening sentence. Man, this guy is really generating loads of torque (lol). Think it might spin my 4 by 1/2 inch bar?

Nicodem

  • Guest
Home made equipment
« Reply #11 on: June 02, 2004, 09:27:00 AM »
You all talk about how nice it is to use heat mantels, but I fucking hate those for a few reasons. The first is that where I live, I can't buy them without raising suspicions. The second is that they are mostly usefull just for reflux rections (there is no way to regulate the temperature in the flask). And they can burn some product with the hot spot that generate above the liquid level in the flask. I used to use an used one and it failed (the heating coil burned!). Now I use mostly just oil baths which are much nicer to regulate and allow for stirring.
The heater above can bee dangerous only if a stupid person is using it. The only exposed electrical parts are submerged in the oil and you would have to bee quite stupid to put your fingers in the oil bath and try to tuch the wires. Besides oil is an el. insulator and you would have to really press on the wire to get a shock. If you are a kind of person who can't keep his fingers away from electricity you can still put a transformer in beetwen and calculate the resistance needed for the transformers voltage. Or you can even put some insulation on the submerged wires.
I build two stirrers from a small 3V electromotor with a magnet atteched on it and a transistor regulating the rotations. They both work perfectly nice with standard mag. stirrers from 5mm to 5cm long. Never complained about them. It's no fucking big deal to build them. I did not bought any part for them. Everything was from some old stuff that would otherwise end up in garbage.
I really don't know why do you make such a big deal about making these things yourself. Didn't they teach you anything in the schols in the USA?


Sredni_Vashtar

  • Guest
Magnet wire
« Reply #12 on: June 02, 2004, 11:08:00 AM »
bio: No, I'm not a naysayer. It's a good idea, but I don't like having exposed 240 Volt wires around the place, especially when you are busy and concentrating on other things.

Maximum oil temperature will be somewhat below the melting point of the solder connections (183C or ~225C for lead-free).

Edit:

Thinking about it, it is probably not so dangerous, but I'd still run it from an isolation transformer (they're good to have around anyway).

Nicodem, have you tried using a pulse-width-modulated power supply for the stirrer motor? That way you can maintain the torque at low motor rpm. You can make a good stirrer from a powerful PC fan like this. Cut the fan blades off and glue a pair of magnets onto the hub.


Nicodem

  • Guest
electromotors
« Reply #13 on: June 02, 2004, 04:02:00 PM »
Sredni: I didn't use a PC fan electromotor because it is impossible to regulate their RPM by voltage regulation.  They are brushless motors with a circuit that does its best to keep the RPM stable. That makes them unsuitable for RPM regulation by changing the electric potential. Once the potential falls below the min U they loose torque and fail to stirr the magnet. I guess your idea of pulsed current works but making such a regulation is much more hard work. You would need at least an IC (like NE555) and a transistor. Instead all I use is a single transistor because 3V electromotors don't loose torque so stepwise. In contrast to a brushless motor like a PC fan, they simply draw more current if they loose rotations giving more torque.
In few words: A home made mag. stirrer works just fine and it only take a few hours of work to make one and a few old electro(tech)nical parts that cost nothing.


xxxxx

  • Guest
put wires inside pyrex tubing ?
« Reply #14 on: June 02, 2004, 04:15:00 PM »
the exposed wires are the part that i like least. the nichrome wire could be put into pyrex tubing and then this could be shaped into a coil. this is how i tried to make a tube furnace: one pyrex tube wrapped with nicrome then another pyrex tube over that. i seem to recall that with modern electronics dc motors can be controlled very precisly as to speed and torque. i was reading design news which is a trade publication for engineers. there is too much good stuff in there to list but for dc drives and controls check cleveland machine controls and danfoss electronics.

Sredni_Vashtar

  • Guest
Motor controller
« Reply #15 on: June 02, 2004, 05:57:00 PM »
Nicodem: I've been tinkering with a fan this afternoon. You can cut the speed by lowering the voltage with a series resistor but the resulting torque is poor.

xxxx: I've seen some PCM motor controller modules for 10-15 Euros at various hobby electronic outlets. Not sure how they'll interact with the brushless motor design though.


Nicodem

  • Guest
Nicodem: I've been tinkering with a fan this...
« Reply #16 on: June 02, 2004, 07:28:00 PM »
Nicodem: I've been tinkering with a fan this afternoon. You can cut the speed by lowering the voltage with a series resistor but the resulting torque is poor.

Indeed, such reduction in RPM is just the consequence of repeated failing in catching up the weakened magnetic field and not in the reduced rotation frequency of the field. Hence the torque is too bad to rotate the stirrer. That is the problem with brushless motors that I mentioned. The only way to usefully reduce RPM in such a PC fan motor is to reduce the rotation of the magnetic field. But the circuit controlling it is integrated inside the motor which gets hopelessly damaged if opened. I tell you, it is much better to simply use a normal 3V electromotor. It works great.

Edit: I can write detailed instructions on how to make the RPM regulator and put a magnetic stirrer togeder if I hear somebee telling me that it would bee helpfull.


Sredni_Vashtar

  • Guest
PC Fans
« Reply #17 on: June 02, 2004, 11:56:00 PM »
Nicodem: You're right in what you say. PC fan speed control seems very limited.

Your heater is excellent. It would be good to have a Hive standard diy stirrer. The one on Rhodium's page is a good basis but runs on a shaded pole motor, and as far as I can tell, these are difficult to control well, too.

https://www.thevespiary.org/rhodium/Rhodium/chemistry/equipment/magstirrer.html


I just found this on the Mad Science forum :


http://www.sciencemadness.org/talk/viewthread.php?tid=1689


http://www.geocities.com/brainfevert/magstir.html


Also had this hotplate:


Much more productive use than flattening shirts.


ning

  • Guest
thoughts
« Reply #18 on: June 03, 2004, 04:54:00 AM »
A lamp dimmer would probably work nicely to control mantle temperature, much lighter and more compact than a variac. Make sure it's strong enough to supply the wattage pulled by the mantle.

By properly series and parallel connecting wires, one could arrange for as much area as they wanted. Honestly, I think a 19 foot wire could probably handle 300 watts without too much trouble.

Apparently, multistrand picture-frame wire is nichrome and good for this sort of thing.

I wouldn't waste so many nice large resistors to make a mantle when nichrome is so easy to get.


xxxxx

  • Guest
ac motor speed related to frequency of ac
« Reply #19 on: June 03, 2004, 04:35:00 PM »
in electronics class they told us that the speed of an ac motor equals the number of polarity changes of the current divided by the number of poles in the motor. so for an 1800 rpm motor on 60 cps has 2 poles. in order to change the rated speed you can change the frequency of the current. you can do this by buying a triplite power inverter and replacing the capacitor that regulates the 60 cps output with a variable capacitor. for regulation of the heating element, a light dimmer usually has a maximum of 600 watts. if you want to go above this a powerstat variable tranformer from superior electric might be a good investment.

Nicodem

  • Guest
Building a magnetic stirrer
« Reply #20 on: June 03, 2004, 05:24:00 PM »
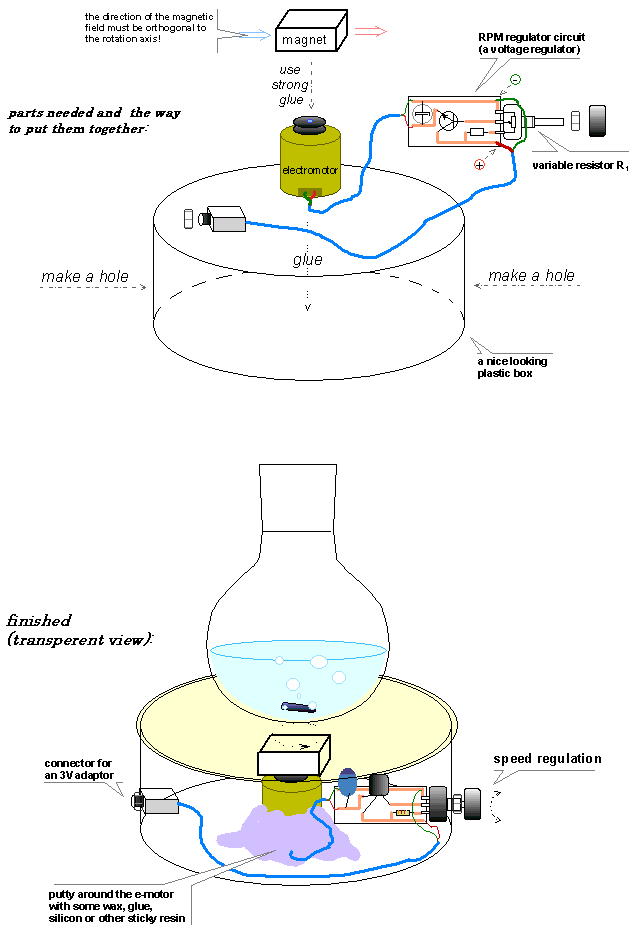
Building a magnetic stirrer – instructions for the layman (or laybee)

You can get an idea on how to build a magnetic stirrer by checking the drawing. Therefore I will rather concentrate the instructions on where to get the material and how to make the RPM regulator.

The magnet

Finding a strong enough magnet should not bee a problem. They are an essential part of many machines. Notably, the strongest magnets are found in loudspeakers and DC electromotors (in cars etc.). These can be broken in order to obtain a small ~2.5cm piece.
It is however a little more difficult to get a piece of more symmetrical dimensions appropriate for a magnetic stirrer. The magnet in the bicycle dynamo is round and its magnetic field expands in four directions. It could be used but it is quite heavy and you would need a stronger electromotor to drive it. I found the best magnet in an old analog electricity consumption counter. Some contain a quite strong and square magnet (like shown on the drawing). In the case you can’t get a magnet of appropriate form you can use a piece broken from a loudspeaker that is put in a plastic round stopper and fixed with wax. It has to bee fixed so that its magnetic field expands orthogonal to the axis of rotation. This field can bee felt and checked by using another small magnet to find the attraction and repulsion sites. Try your best to fix the magnet in the center otherwise the whole stirrer will vibrate extensively when rotating. In such misfortune use some wax to balance the eccentric weight.
Avoid weak magnets like the ones used for billboards – check if your magnet is capable of moving the stirring magnet at a distance of at least 7cm before deciding that it is strong enough.

The electromotor

Small electromotors are everywhere around you. Find an old cassette player, an old electromechanical toy, a batteries powered mini-fan or whatever else and take out the e-motor. Make sure it is not a brushless or step motor as these need different speed regulation (a useful motor will only have two connecting wires). Don’t take off its transmition wheel, as you will need its upper surface to glue the magnet on it. Check also what is its working voltage Um (if nothing is written on it assume the voltage needed is the same as the one the whole machine/cassette player/toy worked on). It shouldn’t bee wider than ~3cm so it will consume less than ~0.3A of current (Im) – this will bee enough and will make the RPM regulator easy to make.

The electricity source

Nowadays it is so easy to buy an adjustable 3 to 12V electricity adaptor. If not adjustable, chose one that will give at least the voltage of the electromotor but not more than ~2V more. Assuming you got yourself a 3Velectromotor from a toy, you can also use the adapter of your old mobile phone battery charger or some other 3 to 5V source, as the power needed is truly small (~1W). Avoid using higher voltage than the one used in calculating the RPM regulator parts or the transistor might overheat. You can use a connector like shown on the drawing or, if you will use the adaptor only for the stirrer, you can simply skip the connector and solder its wires directly on the RPM regulator (cut the wire and find the polarity). The stirrer will only work if the polarity (+ and - side) is correctly orientated so pay attention to this.

The RPM regulator

These e-motors can have their rotation speed regulated from min to max by a simple voltage regulation circuit. The circuit described here is the simplest possible of the useful types and it only requires a variable resistor (R1), a transistor (T), a capacitor (C) and a resistor (R2). The circuit shown on the drawing is built on an etched circuit board, but this is of course not worth the work for such a small thing. Better use a 2×3cm piece of an already etched and drilled universal board that can bee bought in any electronics shop. Actually you can even simply solder the few elements on the variable resistor if you don’t care for its “state of the art” look. The electronic parts can bee obtained from old cassette players, TV or other electronic accessory. Or you can simply buy them where you buy the board (it costs a few $ - the board and R1 being the most expensive pieces). Choosing the types is wide open.
The transistor (T) used should support the electromotor current (~0.1 to 0.3A) and dissipate ~1W power – BC219 or similar should do (ask the vendor for analogue ones). You can either ask the vendor to mark you the position of collector, emitter and base of the three contact wires or find the specifications on the net using the type code in a search engine. Read about transistors on the net anyway in order to understand more. It is very important to connect it properly or it will not work.
The capacitor (C) should bee anything from 22microF to 220microF for 16V (or more, but they get bigger in dimensions). Mind the +/- signs on the chassis and orientate it so that the “–“ wire is connected on the minus lead on the board. Again, use the search engine if you know nothing about electrolytic capacitors.
The R1 and R2 properties are more specific.
Choose R2 by assuming your e-motor works at Um, need up to Im and solve the equation: R2=120*U/Im. Lets say you have a 3V e-motor (U=3V) that need max 0.3A of current (Im=0.3A) as these are the extremes for the most common small e-motors (like in toys etc.). This gives R2=1200ohm (1/4W size will do).
Lets say we have a 4.5V adapter (Ua=4.5V; an old mobile phone charger for example). The voltage drop on R1 will have to bee about Um or just a little more. We can therefore calculate the needed resistance: R1=R2*Um/(Ua-Um). For our case this would bee 2400ohm but it should bee a little more in order to use R1 also to switch of the stirrer at the min position. I think the nearest standard is 2700ohm, but in practice 3900, 4700 or 5000ohm would work as well (the only difference will bee the widening of the “switch off’ threshold). Now we have all the specifications needed.


That’s all

When you have all the material it will take you a few hours to solder the RPM regulator together and glue the parts inside a plastic box (depends on your skills and imagination). Enjoy.

Edit:
PS: I just realized that the BC219 transistor is quite old and might bee hard to come by. Therefore just ask the vendor to give you any switch or low frequency transistor that can handle 0.3A and can dissipate 1W of heat. I think something like BC140 or BC 141 are much more than enough (

http://noel.feld.cvut.cz/semi/philips/acrobat/7365.pdf

). There are hundreds of other types useful like 2N1613 and others. If using a really small e-motor that consume less than 0.12A (e-motors in walkmans) you can even use BC107, but keep in mind that you should use a reduction wheel with an elastic bend (also from a walkman) as these e-motors don’t have much torque.


barkingburro

  • Guest
ok question
« Reply #21 on: June 04, 2004, 10:37:00 AM »
how are you going to heat the mantle at this point?

Organikum

  • Guest
some remarks on stirrer and heatingmantle
« Reply #22 on: June 05, 2004, 09:35:00 PM »
Stirrer:

The best source for strong magnets which are already perfectly shaped and come in identical couples of two are old harddisk-drives. Neodym. Best.

I personally wouldnt try to "fix" anything by using wax, this is absurd. Two component epoxy is the way to go.

RPM regulation by reducing the voltage on DC motors is plain bullshit as one looses all torque and the stirrer will not stirr anymore at lowered rpm´s. There are cheap rpm refulators available at Radio Shack (US) or Conrad (EU) which regulate rpm without this drawback and also hold the rpm "fixed". (they just interrupt the current periodically and have a feedback included). This is to be found in all drilling machines nowadays and available for AC and DC motors. Go better for this.

Anyways if DIY isnt yours dont fuss around but buy the device for this will be cheaper and better in the end.


Heating Mantle:

The advantage of a good electric heating mantle is that it has only a very low heat capazity by itself, say if you turn heat off there is not much restheat conserved in the mantle which heats on for some time. This is the main advantage over heating baths. Building a heating mantle which has a high heat conserving mass makes not much sense at all. If one does this, as less as any possible cement etc. has to be used. If the heating mantle is driven by DC less than about 50 V, it is easy to build a very light device which basically consists only of the heating wires and two layers fiberglass fabric. 12 V are recommended - transformators are readily available for use with halogen-lamps often with power output regulation included.

Not enough power?
Nonsense.
A 150W heating mantle beats every 800W hotplate - perhaps not in heating up time but everywhere else.


The "air-bath":

This is a nice way to achieve even very high temperatures. Basically the flask is contained in a (pyrex) glass or metal container and the air is heated. In old times this was done with open flame and a metal-net to protect the flask, but nowadays hot-air pistols with 300°C to 600°C are readily available for cheap. Such a hot-air bath is instantly improvised with some thick Al-foil. It is very useful for processes like the LOOMIS - benzychloride synthesis (hypochlorite + toluene) where the quick removing of the heat source is essential.
Dont direct the output of the gun directly against the flask please - the input should be tangentially. Also their has to be a little space left open at the neck of the flask where the air can escape - thats understood.


Sredni_Vashtar

  • Guest
Controlling Motors
« Reply #23 on: June 06, 2004, 02:37:00 AM »
I've passed the day looking into motor control. Exciting.

The idea is to design a cheap stirrer based on a 120 mm PC fan with the blades cut off and a pair of rare-earth magnets epoxied onto the hub. Experiments work so far, but can't control the speed very well. Want full torque across the whole speed range with good control. A 5W PC fan is powerful, quiet and reliable for long refluxes, and is low profile.

Basically, we are looking at 2 types of motors in this game: brushed and brushless. PC fans are further complicated because in addition to being brushless, they have some active circuitry to control speed.

With a standard brushed motor, when you apply load, it slows down. As it slows, it's resistance drops. If you use a  series resistance to control the motor, the drop in motor resistance causes a fall in voltage across the motor. This reduction in power reduces available torque.

The way to avoid this effect is to use a Pulse-Width-Modulated power supply for the motor: it always gets full voltage, but the voltage is applied in varying width pulses. This way, you get maximum torque at all motor speeds. Typical PWM controllers run at 5-20 KHz pulse frequency.

Another problem is that common brushed motors operate at too high a speed for a magnetic stirrer. Typical low voltage DC motors are 8000 rpm or more. You want say 150 - 1500 rpm for your stirrer with a typical 400 rpm speed. Unless you want to operate your motor at 10% capacity all the time, you need a reduction gear or pulley.

Brushless motors (including most PC fans) can be controlled by a PWM controller. PC fans tend to operate at a lower speed to start with (2500 rpm) so you can get away without the gearing. However, PC fans require a low frequency PWM to allow the internal electronics to function properly, say 20 - 160 Hz. I haven't found a commercial controller that runs at this speed. I've ordered some parts to make one and will post results. Ordinary PWM controllers probably work on PC fans but not efficiently - has anyone tried?

PWM   circuit

(http://casemods.pointofnoreturn.org/pwm/pwmtheory.html)

Finally magnets. The most powerful available are Neodymium-Iron-Boron (NdFeB). These are fairly cheap but have a low operating temperature (some well below 100 C). Get above this and the magnet dies. Need to be careful with the magnets close to the hotplate. Best for hot areas are SmCo (Samarium Cobalt), but these are not as powerful, uncommon and expensive. I'll go for the NdFeB and see how it goes.

Wonder Magnets - types of magnets and uses

(http://www.wondermagnets.com/cgi-bin/edatcat/WMSstore.pl?user_action=category&category=Magnets_and_Magnetism)

Organikum: hard-drive magnets sound a good source for this.


Nicodem

  • Guest
Magnets, regulators and other isuess
« Reply #24 on: June 06, 2004, 03:46:00 PM »
The best source for strong magnets which are already perfectly shaped and come in identical couples of two are old harddisk-drives. Neodym. Best.

I agree with Organikum. The NdFeB magnets from HD-drives are the best. I used them in one of the three stirrers I built, but in my experience it is very difficult to get them off the metal jacket where they are fixed on. I broke all of them trying to get them off. So I considered them as the “non-symmetric” ones. Though I only tried with three old HD-drives and they all had magnets of slightly different shapes and fixed in different metal jackets so you might bee lucky and obtain a good one if you smash enough drives. Maybe there some fixed only with a screw? Maybe the best thing is to simply bend the metal jacket in order to expose the two magnets upward. At least this is how I see Organikum’s idea, if understood correctly?

I personally wouldnt try to "fix" anything by using wax, this is absurd. Two component epoxy is the way to go.

Maybe I did not express my self clearly enough. I said the magnet (if unsymmetrical or impossible to glue on the e-motor) should bee fixed in a round plastic container with wax (or some other flexible resin). Then, the plastic container should bee glued to the e-motor with very strong glue.
You can’t use epoxy resins to fix the magnet in the container. How are you going to re-fix the magnet in order to remove the vibrations caused by mass unbalance when it is fixed with hardened glue?
I used this trick with one of my mag. stirrers and it works perfectly with the broken magnet from a HD. It was also the easier one to fix the vibration problem which is the main trouble when you don’t find a magnet of symmetrical shape.

RPM regulation by reducing the voltage on DC motors is plain bullshit as one looses all torque and the stirrer will not stirr anymore at lowered rpm´s.

Organikum, you are exaggerating and complicating way too much. In all my three stirrers I used this basic voltage regulator and it works like a charm even with the minimum possible speed. The one described can nicely rotate a 3cm stirrer at ~2 rotations per second and goes to a max where you can’t see the stirrer anymore. It can make rotate 1/2L of liquid in a really strong vortex pulling air at the center. I can’t say if the other two regulators would also work as slowly since I use them for the other two stirrers which are of different design using reduction wheels connected by an elastic band. I can’t find anything faulty in these home made stirrers that would make the commercial ones superior. The only thing they truly lack is a hot plate.

DC electromotor properties:
If a DC motor does not have much internal ohm resistance it will keep enough torque even if the voltage lowers and consequently the RPM’s drop. At lower RPM the counter-potential drops as well and consequently the motor can draw more current which give a stronger mag. field resulting in more torque. This is exactly why electric vehicles usually don’t require a transmission gear if such motors are used. It is a self equilibrating process. I know this from theory as well as from experience. But all this apply only to the normal DC e-motors. Brushless or step-motors require a completely different and more complex circuit for regulation.
Those interested should check the link Sredni found where the pro/contra of varius RPM regulations are described:

http://casemods.pointofnoreturn.org/pwm/index.html


Anyway, you are right. Most bees here know shit about basic electronics so it might bee more practical to simply buy a regulator, but make sure it applies to your e-motor as there are many different types. The regulator in the AC drilling machines, for example, is only a simple rheostat and will work only with an AC brushed motor. Many precise RPM regulators that can bee bought only work for step-motors (like those found in 3.5 or old 5-inch drives). So make sure it will work before you waste your money. Or simply buy the motor and the regulator together.
I would not humiliate myself by doing so, though. There is already so much garbage material around that can bee recycled into useful equipment. Besides electronics was my hobby when I was a kid and I like doing these things from scratch.

Sredni:
If you “use a series resistance to control the motor” you will never attain any useful RPM control. This is nearly not the same as controlling voltage which allows the motor to draw as much current as it needs. A resistor limits the available current causing the motor to fault. It’s no wander why you loose torque. Try using a transistor and you will see how huge the difference is.
I’m afraid that anything above 10Hz will negatively interfere with the PC fan internal circuit. It would probably still work at high frequency PWM regulation but in the same fashion as if you would just limit its current (loosing torque). The frequency should bee at least three times lower than the frequency of the steps in the rotating mag. field. This is of course impossible when you would want for example only 5 rotations per second. Assuming there are six coils inside the motor the frequency of the PWM should bee 5×6/3=10Hz. However, try and report back (but use a lower power transistor than the one described in your link – a PC fan only consumes less than 200mA!).
The heating caused by a hot plate or oil bath is not such a problem. I attached two aluminum disks (from old HD-drives) separated by ~2mm in on top of the stirrer. This insulates and dissipates excess heat from the oil bath perfectly. Hot air goes up so you don’t have to worry for the stirrer to heat up (most certainly not up to 100°C).


Organikum

  • Guest
hdd - magnets and more
« Reply #25 on: June 06, 2004, 07:41:00 PM »

but in my experience it is very difficult to get them off the metal jacket where they are fixed on. I broke all of them trying to get them off.


You dont need to get them off, they are usually placed on two identical metalpieces and may be used together with these. The metalpieces also close the magnetic field and the magnet is much more powerful with than without.
If you really desire to get them off you may bend the metal where they are fixed on - the metal is soft and easy to bend - and they will go off with ease. You cannot pull them off anyways, you have to shove them.
Talking of magnets from 3,5" drives and 2,5" drives. Magnets from very old 5 1/4" are another story though  ;D

The question of torque just depends on WHAT you stirr. It seems that I stirr mostly stuff which thickens or is heterogenous - probably thats my reason for preferring strong stirrers (in the end nothing beats an overhead stirrer/vibrating stirrer anyways).

And hey Nicodem, you wrote WAX.
And I dont think thats a reasonable way to fix ANYTHING.
Maybe I am wrong.
Dont think though....
;)

ORG


Sredni_Vashtar

  • Guest
Motor Speed Controller - Works with PC Fan!
« Reply #26 on: June 07, 2004, 12:16:00 AM »
I knocked up a PWM controller as per the website design. I tried 3 PC fans and a 2.5V brushed motor from an electric toothbrush.

With all motors, high driving frequencies were much better than low. Up to several hundred Hz, the motors made funny noises and stalled easily when driven slowly; torque was also low.

40 KHz was was inaudible and gave good results. A 120 mm PC fan can be smoothly controlled from around 250 rpm up to 2500 rpm. Decent torque from about 400 rpm upwards.

You don't need to build a circuit. Buy a pulse-width-modulated low voltage motor controller - can be had from various hobby and electronics suppliers. Ready made controllers operate at high frequencies and should work find with PC fans.


PsuedoPsycho

  • Guest
Nicodem Super Hero of cladestine DIY Gear
« Reply #27 on: June 07, 2004, 06:10:00 PM »
Nicodem I dont know what country you are from, but your
 knowledge and vocabulary is excellent! You would get my vote for Noble cladestine chemistry pillar of the community
award! Keep up the good work!
AFOAF SWIM met recently built a contraption from magnets
ghettoed out of a pc hard drive and a Apple floppy disc
drive from 1984 (shame)It would have sold good at the ever so popular auction site in antique pc hardware!?
Cheer's and keep up the good work!!