


PART I: dream this imaginary portable hand-held ghetto gasser
PART II: easy instructions for cleaning and recrystallization of hcl crystals from water
PART III: Safety considerations
PART IV: Construct this fume hood for windows (no, not the computer program, heh)
This is most likely old hat to the scientific community by now, but gonna document down for the newbies.
ghetto hcl gasser (look ma! no glue, glass, or sulfuric needed)
The reason it's portable is because you can open a small window that has a black breathable light curtain on it, put a small folding table up next to the window, or instead of a folding table, you can use a wide board sitting on top two stools spaced apart. Back up the 6-brushless computer fan rubbermaid exhaust bucket up against the hanging black light curtain in the open window, plug it in and you're set. For shits and grins, you can toss a handful of downy sheets in a dryer that has an exhaust to the outside and run it the whole time to mask any of the smells that travel outdoors and evaporate into the air quickly for the short few minutes gassing period.
Materials needed for an imaginary handheld super-dry gasser:
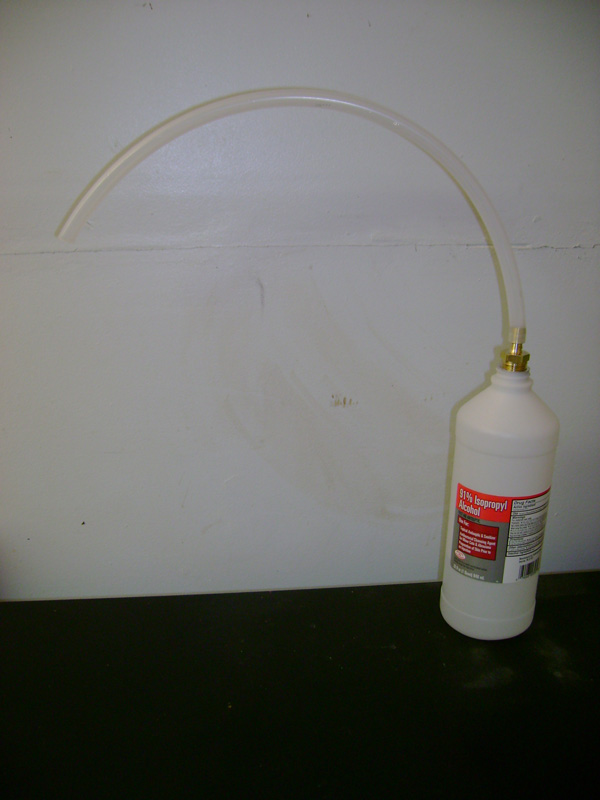
#1 91% isopropyl alcohol HDPE 32 fl oz (946mL) bottle from *******
#2 Watts A-300A i.d. barb to mip adapter 3/8" by 1/2" from **** *****. or just use 3/8" inner diameter vinyl fish pump tubing.
#3 25' roll of watts polyethylene 1/2" by 3/8" tubing used for food/water uses from **** *****. cut off a short piece.
#4 box of **** *** (calcium chloride)
#5 jug of 31.45% muriatic acid
#6 measuring cup
#7 gloves
#8 gas mask
#9 safety glasses
#10 home made fume hood
#11 funnel (for pouring the CaCL & muriatic into the bottle)
* Pour the 91% isopropyl alcohol from out of the bottle into another container, but keep the empty 91% isopropyl alcohol bottle, dry it out for 15 minutes or so in front of a hair dryer to get it completely dry.
* Instead of watt's polyethylene tubing, you can use just plain old fish aquarium tubing which is 3/8" inner diameter, with an outside diameter of 1/2", this stuff is available at every hardware store, and it works really great in place of the watt's tubing.
Before beginning, make sure the fume hood is turned on and the fans are pumping air to the outside through the fume hood. Make sure too be wearing jeans, safety glasses, gloves, and gas mask. Have jar to be gassed sitting in the fume hood with the lid off.
#1) Add 500mL (2 cups) of calcium chloride to the empty alcohol bottle, then add 120 mL (1/2 cup) of muriatic acid to the bottle..will see it bubble a tiny bit...then screw on the barb adapter attachment. The barb adapter should have hose already attached to it--no glue necessary--they fit perfectly together and will be extremely difficult to pull apart when together.
The barb threads into the top of the bottle, perfect fit. Be sure to wrap a single wind or two of plumber's tape around the barb threading before you thread it into the bottle...this will 100% ensure that no leaking takes place, it can be used without plumber's tape and there will still be no leaks, but to always be sure, wrap some plumber's tape around the barb before threading it in.
Now just put the hand held gasser in the fume hood and let it sit for 2 minutes (wait for the cacl to do its thing and suck the water from the muriatic, leaving pure concentrated gas in the bottle). Now picks up the gasser and press on it a little bit and you will see a "large puff" of pure hcl gas exit the wand...do this a few times in the fume hood so you can make sure the fume hood is working really good. To get gas instantly after assembling the thing (if you don't want to wait 2 minutes), simply shake the contents of the bottle up and down real hard for 5 to 8 seconds, this will cause it to work right away and create super huge puffs of gas each time it is squeezed.
#2) Now insert the wand into the jar #1 --1000mL or so of 1st xylene pull -- make absolutely the non-polar has been dried previously with dried epsom salts. The non polar that you are gassing needs to be dry, dry, dry to be gassed and leave sparkly white hcl crystals after the cleaning process. Squeeze on the gasser bottle while the wand is submerged in the non-polar, it will bubble about 10 to 15 medium sized gas bubbles, then pull wand out while still holding the "squeeze" on the bottle....Repeat this about 5 to 10 more times...this only takes a minute or two....you will immediately see a "snow" of hcl crystals form in the dried non-polar and they will sink to the bottom.
After you are done gassing, put the jar into the freezer with the lid lightly closed over it but not sealed tightly all the way, leave it in there for 1/2 hour, this will allow plenty of time for all of the hcl crystalsl to fall out where they will all collect on the bottom into a 1/2" to 1" layer or more.
Here is how you make drying salts for drying your non polar: get a big bag of epsom salts and sprinkle out a bunch of it onto a large pizza or cookie baking pan, have it layered about 1/4" or so, spread it all around until it covers the entire surface of the pan.
Then put the pan into the oven on bake for exactly 2 hours at 400 degrees F. As the epsom salts dry out they will put out some steam and what not, so have a vent running to exhaust, it's not smelly at all, just have it vented.
After the 2 hours, pull the pan out of the oven using mits, and use a spatula to scrape up the now dried rocks and chunk them into an empty dry mason jar, then seal the mason jar with it's lid, and it will keep like this forever.
#3) the recipe given above will produce enough gas for just about any task. Don't mess around with the recipe above, use only 2 cups of calcium chloride and 1/2 cup of muriatic, it creates gas a plenty for any task, enough gas for continuous use for around 5 minutes, and you will only need to actually use about a couple minute's worth of the gas, then you can extinguish the bottle by following directions below.
Important: when done gassing, screw the barb off the bottle, put the bottle under a sink faucet, and fill it up to the top with cold water to stop the reaction from producing gas inside the bottle. Then walk it over to the nearest toilet and pour the used contents into it, flush toilet, that's it.
HELPFUL TIPS:
1. Have noticed that all the 91% isopropyl bottles appear to be the same standard size with the same standard opening for the barb, most likely your local grocery store will have the same bottle as the one that's available from *******. It just so happens that the barb size given threads perfectly tight when threaded into the top of the bottle, 100% leak proof.
2. You will probably shit a brick the first time you make a gasser, and sweat will be pouring down your face from the anxiety and fear, but after you get over the initial fear, and see that it's easy to do and harmless so long as you're wearing a gas mask, it will then be like second hand and relaxing actually, heh.
3. after you first assemble the gasser, you can make it start gassing within just 20 seconds by shaking the contents of the bottle up and down real hard for a few seconds, after you do that, hold the gasser bottle up to a light and gently press on the bottle, you will see a huge puff of gas exit the bottle, it will be able to do this for about a good 5 minutes or more every time you press on the bottle....super huge puffs of gas will exit the bottle each time it is squeezed. If you see at any time (say 3 minutes) into the gassing, that you need more huge puffs of gas, simply shake the contents of the bottle up and down about 4 times, and once again it will puff dragon for several more minutes.
4. When done gassing (the bottle will be slighty warm to the touch still) screw the barb off the bottle, put the bottle under a sink faucet, have the faucet put out a skinny slow stream of water that will flow into the bottle's opening (once the barb is screwed off) and fill the bottle up to the top with cold water to stop the reaction from producing gas inside the bottle. Then simply walk the full bottle to the nearest toilet and empty the used contents of the bottle into it....flush the toilet....reuse the empty bottle, the same bottle can be used over and over for years.
5. There is absolutely no need to create a drying tube chamber in the wand with extra calcium chloride, absolutely none! This process can be dreamed countless times without a drying tube and each and every time the gas will come out 100% dry! don't be fooled into thinking you need an extra drying chamber, you don't need one, the ghetto gasser expels super dry gas each and every time AS IS. You need to remember that when the gas exits the tube and hits the humidity in the air, you will be able "to see the gas", otherwise it would be invisible to the naked eye. Plus there is no need to use a pump style insect killer container or anything elaborate like that as I've seen someone assemble, keep it simple, this back to basics ghetto gasser works 100% fine as is, breaks down when done in less than a minute, and the bottle is re-usable forever.
6. Remember to dispose of the contents of the container into a toilet within a 30 minute period, simply turn the bottle upside down and all the contents will pour out with ease...because if you wait longer than this, the rocks in the bottom of the container will harden into a single globule mass, making it impossible to get the rocks out of the bottle. If you forget to dispose of the contents within 1/2 hour, then you will have no choice but to throw the entire used bottle away.
PART II
treatment of gassed crystals
A special note on the treatment of xtals that result from gassing:
1) after you have gassed your solvent and all the crystals have rained out to the bottom, typically after 1/2 hour of it sitting in the freezer with the lid on,
2) then pour the post-gassed solvent thru a #103 filter disc situated inside a buchner cup, be sure to pre-wet the filter disc sitting in the cup with a bit of cold dry acetone, pour the post-gassed solvent thru the filter disc in the cup with vacuum applied first, by applying the vacuum first, you will assure that no xtals will sneak in thru crevices or air pockets in between the round filter disc and the cup. anyhow, you can use a really cheap one hundred dollar vacuum pump from one of those chinese freight outlets, those work great for a cheap vacuum source for your buchner cup.
3) so now all your hcl xtals are sitting on the filter disc in the cup
4) now rinse the xtals x 3 times with liberal amounts of cold dry acetone
5) now continue to apply vacuum for 2 minutes to air dry the xtals on the filter
6) once the xtals have dried in the cup on the filter, then scrape them off with a razor blade into a pyrex dish
7) now take a pile of the xtals and dump them into a mortar and pestal, then add just enough cold dry acetone to barely cover the xtals, now pestal the xtals round and round for at least 3 minutes, this will clean the xtals very well, almost as well as a rextallization, except that this involves manual labor.
8. now take the contents of the mortar and pestal and pour it thru a new 103 filter disc in a buchner cup with vacuum applied first, rinse the mortar and pestal out three times with small amounts of cold dry acetone, pouring the rinsed contents thru the filter on the vacuum setup to help rinse the xtals that are allready there, this reclaims any lost xtals that are still sitting in the mortar and pestal as well. now continue to apply vacuum until all the xtals on the filter disc are air dried
9) now use a razor blade to scrape off the cleaned xtals from off the filter disc into a pyrex brownie dish
10) Now this is very important !!! no matter how clean you think your xtals are after all the mortar and pestalling, they still contain solvent residue from the xylol or toluene, the ONLY way (besides recrystallization) to get rid of this solvent crap is to now dissolve all your clean xtals in about 30 to 50ml of warm (about 160 degree F) distilled water. simply add all your mortar and pestalled clean xtals to a brownie dish, spread them out, now pour 30 to 50ml of distilled water only (hot is good) onto the xtals, they will dissolve into the water.
11) now point a clean fan on the hi setting at your brownie dish on an even surface, allow several hours for the fan to evaporate off the water....the xylene or tolly will form an AZETROPE with the water in the dish, and will evaporate off into the air, leaving behind 100 percent totally clean xtals in the dish to scrape up after all the water has evaported off.
12) you MUST do step number 10 above, the trick of adding all your xtals to a small amount of warm distilled water....then evaporate off the water....this is the only way to get totally clean xtals...all these steps are just as effective as doing a rextallization, here we are rextallizing the xtals from water while at the same time the fan is causing the xylol and tolly residue to evaporate into the air with the water....this is the only way to get rid of that xylene or tolly taste that will not go away no matter how much mortar and pestalling you will do....you must do the water trick step....if you don't the tolly or xylene residue trapped inside the xtals will take away from the experience , and can cause side effects like head buzzing, slight confusion, agitation, anxiety, etc. but by doing the water trick, all side effects are eliminated, can't stress enough how important this is. the xtals after you scrape them up from the brownie dish will have absolutely no solvent residue taste what so ever, and only taste super bitter like they are supposed to, when you take the water evaporated xtals as compared to just mortar and pestalled xtals, the difference is like night and day....the experience is super clean and the xtals reach the brain with maximum impact as there is no solvent residue on them to weigh them down or skew the effects.
13) You will be able to minimize the losses due to acetone mortar and pestalling by going back and scraping off all the excess left behind powdered yield from off the pestal and off the mortar back into the pyrex dish with scraping using a downward motion with a razor, typical loss was only 50mg, for example, 1000mg can be mortar and pestal cleaned, and you should always get back about 950mg or so, so just always scrape the left over powder off the pestal or from inside the mortar back into your pile, also when the acetone rinse jar is checked on after several days, there should be a layer of re-claimed xtals at the bottom, leaving the jar in the freezer for 7 days will reclaim the total amount of lost xtals. recommend cleaning only 1 gram amounts in the mortar and pestal at a time as it allows for better cleaning and no splashing.
14) when you are done with everything, add a splash of hot distilled water to your mortar and pestal, this will reclaim any trivial amounts of powder left behind that could not be scraped out. The crystals will instantly dissolve into the water. Then pour off the water into a small brownie dish, evaporate off the water to reclaim any left over yield.
---------------------------------------------------
* special notes:
* you will notice that when you typically mortar and pestal an amount of say 1 grams of xtals, that you will only get about 950 mg of the xtals back super clean, just remember to save all your yellow/brownish acetone rinses and put them in the freezer for 7 total days, at the end of that time, all of your "lost" xtals will reappear in the bottom of your acetone rinse jar.....this doesn't happen overnight, it takes about a week: just simply pour the contents of your acetone rinse jar thru a 103 filter with vacuum applied to reclaim your lost xtals, you will get alot of them back, just rinse them with acetone x 3 times, then after they are dry, add them to 30ml of warm distilled water all in a pyrex dish, point fan at dish for several hours, and after the water has evaporated off, then scrape up your 100 percent clean xtals with absolutely no solvent residue what so ever.
* to make "dry acetone" this is what you do: spread a thin layer of epson salts onto a pizza pan, place in the oven at 400 degree F for 2 hours, then pull pan out of oven, scrape up your now dried salts with a spatula and put them into a sealed mason jar, they will keep forever dry this way.
* now add about a handful of the dry salts to a jar full of acetone, shake it up for 1 minute every 10 minutes for 30 minutes, then put the jar into the fridge, after several hours, the acetone will turn clear again as all the salts will have fallen to the bottom, use the acetone out of the jar as is by using a long glass pipette to suction the now super dry acetone from on top the rocks in the jar....now just use your pipette to drop the cold dry acetone into your mortar and pestal to just barely cover your pile of xtals so that they can be cleaned or pestaled for several minutes in the mortar.
* it doesn't matter if you use cold dry acetone from the fridge, or from the freezer, they will both cause exactly the same amount of loss of product when cleaning, just make sure it is at least fridge cold, but don't forget to save all your dirty acetone rinses in the freezer for 7 days, cause at the end of that time, all your lost xtals will have fallen out of the acetone wash jar in the freezer and formed a thick layer of clean xtals at the bottom, reclaim them!
If anyone get's anything out of this post, it's that mortar and pestalling post-gassed xtals in acetone is not enough, you got it take it one step further and then throw those xtals into a small volume (say 30ml) of distilled water, then evaporate off the water, then scrape up the recrystallized from water shardy looking 100% clean xtals, for some reason xylol and tolly residue likes to imbed itself into the crystal matrix, and the only way to free it is to dissolve the post washed xtals in distilled water to allow it to seperate out and form an azetrope with the water so that it evaporates off....you can mortar and pestal tell the cows come home, but it still wont eliminate the last traces of tolly or xylol from your imbeded crystal matrix. You must do the very last water evaporation trick to get 100% clean xtals with the best experience, bar none.
the difference in the experience produced by the water recrystallized hcl crystals is x 10 better experience, ...all because the xtals reach the brain with maximum effect, locking into those receptors properly., only the bitter taste of the crystals are noticeable, no solvent residue taste what so ever.
PART III
SAFETY CONSIDERATIONS:
THIS IS EXTREMELY IMPORTANT: When preparing the gassing bottle and when using this tek during the gassing stage, You must wear a gas mask for safety reasons....get one from any hardware store...they are about $30 to $40 or so, they filter hcl gas, paint fumes, formaldehyde, etc. Read the label to make sure it is capable of filtering out muriatic gas/fumes...it will say so on the box.
DO NOT PROCEED WITHOUT READING THE FOLLOWING VERY CAREFULLY:
The procedure described below is potentially very hazardous. It uses anhydrous hydrogen chloride gas to salt hcl crystals out of an aqueous solution. Hydrogen chloride gas is an extremely noxious and potentially deadly compound. The procedures described herein are safe as written, however, accidents are possible. Do not even think about dreaming this method without first securing a suitable gas mask or organic vapor mask capable of filtering hydrogen chloride fumes. Learn how to use the mask ahead of time and wear it at all times while the apparatus described is in operation. Work only in well ventilated areas. Do not attempt this dream in a house where children or invalids are present. Failure to follow all safety precautions can result in serious personal injury or death.
Hydrogen chloride gas is serious business. If you are unable or unwilling to follow the safety precautions, then you would be better off not dreaming this method.
All that being said, believe the device shown below to be quite safe. It produces only small amounts of the gas as needed and anyone who can follow directions and has common sense can safely produce beautiful results in dreams with this method.
HCL gas is dangerous. Do not breath it. This gasser produces small amounts of gas on demand by squeezing but you still must do this outside (still wearing your gas mask) or use it inside a fume hood. HCL gas will corrode metal stuff on contact, so keep it inside your fume hood. You must wear safety goggles, gloves, pants, and of course, the gas mask at all times when preparing the bottle and using it. But don't worry it is completely safe...this is even easier then the standard titration imho...It's very easy to put together and use.
PART IV
Construction of the fume hood:
Materials needed:
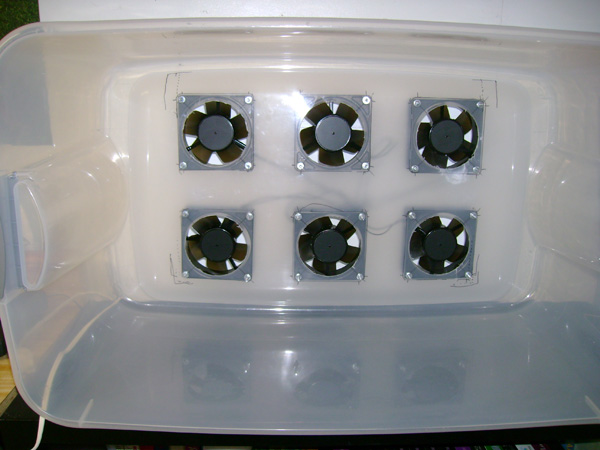
#1) 110 Liter sterlite or rubbermaid container
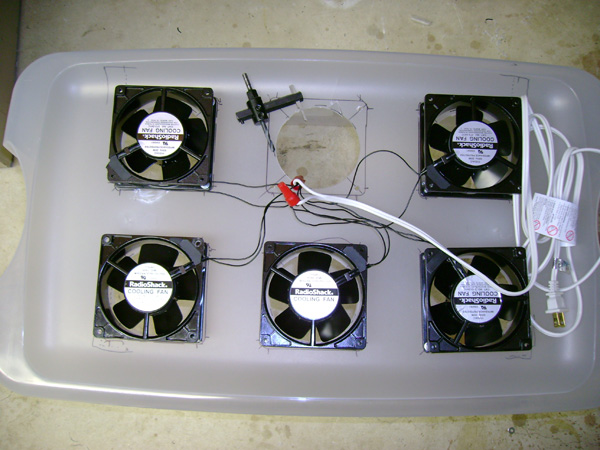
#2) six 115VAC 65CFM brushless computer cooling fans (4.7 x 4.7 x 1.5")
#3) AC cord
#4) soldering iron and solder or can use electrical tape or screw nuts
#5) 6-32 or 8-32 bolts, nuts & washers for mounting the fans
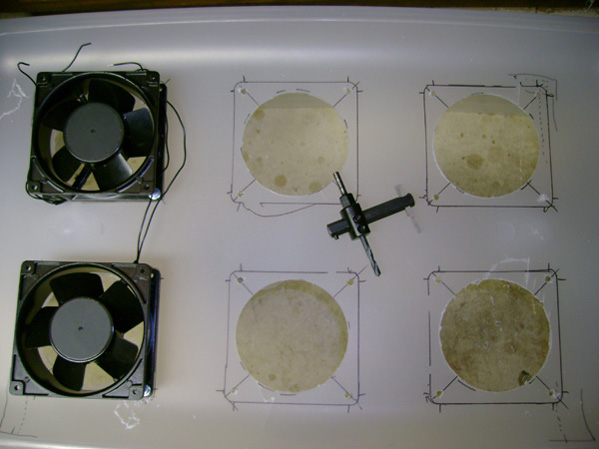
#6) drill circle tool with blade
#7) ruler and marker
#8) drill & drill bits
TIP: Forward and reverse the drill when you are using the drill circle cutting tool to quickly cut out a circle section for each motor--when you fwd & reverse the drill, swim found it cuts through the plastic faster.
Fume hood construction & operation shown below.
PART II: easy instructions for cleaning and recrystallization of hcl crystals from water
PART III: Safety considerations
PART IV: Construct this fume hood for windows (no, not the computer program, heh)
This is most likely old hat to the scientific community by now, but gonna document down for the newbies.
ghetto hcl gasser (look ma! no glue, glass, or sulfuric needed)
The reason it's portable is because you can open a small window that has a black breathable light curtain on it, put a small folding table up next to the window, or instead of a folding table, you can use a wide board sitting on top two stools spaced apart. Back up the 6-brushless computer fan rubbermaid exhaust bucket up against the hanging black light curtain in the open window, plug it in and you're set. For shits and grins, you can toss a handful of downy sheets in a dryer that has an exhaust to the outside and run it the whole time to mask any of the smells that travel outdoors and evaporate into the air quickly for the short few minutes gassing period.
Materials needed for an imaginary handheld super-dry gasser:
#1 91% isopropyl alcohol HDPE 32 fl oz (946mL) bottle from *******
#2 Watts A-300A i.d. barb to mip adapter 3/8" by 1/2" from **** *****. or just use 3/8" inner diameter vinyl fish pump tubing.
#3 25' roll of watts polyethylene 1/2" by 3/8" tubing used for food/water uses from **** *****. cut off a short piece.
#4 box of **** *** (calcium chloride)
#5 jug of 31.45% muriatic acid
#6 measuring cup
#7 gloves
#8 gas mask
#9 safety glasses
#10 home made fume hood
#11 funnel (for pouring the CaCL & muriatic into the bottle)
* Pour the 91% isopropyl alcohol from out of the bottle into another container, but keep the empty 91% isopropyl alcohol bottle, dry it out for 15 minutes or so in front of a hair dryer to get it completely dry.
* Instead of watt's polyethylene tubing, you can use just plain old fish aquarium tubing which is 3/8" inner diameter, with an outside diameter of 1/2", this stuff is available at every hardware store, and it works really great in place of the watt's tubing.
Before beginning, make sure the fume hood is turned on and the fans are pumping air to the outside through the fume hood. Make sure too be wearing jeans, safety glasses, gloves, and gas mask. Have jar to be gassed sitting in the fume hood with the lid off.
#1) Add 500mL (2 cups) of calcium chloride to the empty alcohol bottle, then add 120 mL (1/2 cup) of muriatic acid to the bottle..will see it bubble a tiny bit...then screw on the barb adapter attachment. The barb adapter should have hose already attached to it--no glue necessary--they fit perfectly together and will be extremely difficult to pull apart when together.
The barb threads into the top of the bottle, perfect fit. Be sure to wrap a single wind or two of plumber's tape around the barb threading before you thread it into the bottle...this will 100% ensure that no leaking takes place, it can be used without plumber's tape and there will still be no leaks, but to always be sure, wrap some plumber's tape around the barb before threading it in.
Now just put the hand held gasser in the fume hood and let it sit for 2 minutes (wait for the cacl to do its thing and suck the water from the muriatic, leaving pure concentrated gas in the bottle). Now picks up the gasser and press on it a little bit and you will see a "large puff" of pure hcl gas exit the wand...do this a few times in the fume hood so you can make sure the fume hood is working really good. To get gas instantly after assembling the thing (if you don't want to wait 2 minutes), simply shake the contents of the bottle up and down real hard for 5 to 8 seconds, this will cause it to work right away and create super huge puffs of gas each time it is squeezed.
#2) Now insert the wand into the jar #1 --1000mL or so of 1st xylene pull -- make absolutely the non-polar has been dried previously with dried epsom salts. The non polar that you are gassing needs to be dry, dry, dry to be gassed and leave sparkly white hcl crystals after the cleaning process. Squeeze on the gasser bottle while the wand is submerged in the non-polar, it will bubble about 10 to 15 medium sized gas bubbles, then pull wand out while still holding the "squeeze" on the bottle....Repeat this about 5 to 10 more times...this only takes a minute or two....you will immediately see a "snow" of hcl crystals form in the dried non-polar and they will sink to the bottom.
After you are done gassing, put the jar into the freezer with the lid lightly closed over it but not sealed tightly all the way, leave it in there for 1/2 hour, this will allow plenty of time for all of the hcl crystalsl to fall out where they will all collect on the bottom into a 1/2" to 1" layer or more.
Here is how you make drying salts for drying your non polar: get a big bag of epsom salts and sprinkle out a bunch of it onto a large pizza or cookie baking pan, have it layered about 1/4" or so, spread it all around until it covers the entire surface of the pan.
Then put the pan into the oven on bake for exactly 2 hours at 400 degrees F. As the epsom salts dry out they will put out some steam and what not, so have a vent running to exhaust, it's not smelly at all, just have it vented.
After the 2 hours, pull the pan out of the oven using mits, and use a spatula to scrape up the now dried rocks and chunk them into an empty dry mason jar, then seal the mason jar with it's lid, and it will keep like this forever.
#3) the recipe given above will produce enough gas for just about any task. Don't mess around with the recipe above, use only 2 cups of calcium chloride and 1/2 cup of muriatic, it creates gas a plenty for any task, enough gas for continuous use for around 5 minutes, and you will only need to actually use about a couple minute's worth of the gas, then you can extinguish the bottle by following directions below.
Important: when done gassing, screw the barb off the bottle, put the bottle under a sink faucet, and fill it up to the top with cold water to stop the reaction from producing gas inside the bottle. Then walk it over to the nearest toilet and pour the used contents into it, flush toilet, that's it.
HELPFUL TIPS:
1. Have noticed that all the 91% isopropyl bottles appear to be the same standard size with the same standard opening for the barb, most likely your local grocery store will have the same bottle as the one that's available from *******. It just so happens that the barb size given threads perfectly tight when threaded into the top of the bottle, 100% leak proof.
2. You will probably shit a brick the first time you make a gasser, and sweat will be pouring down your face from the anxiety and fear, but after you get over the initial fear, and see that it's easy to do and harmless so long as you're wearing a gas mask, it will then be like second hand and relaxing actually, heh.
3. after you first assemble the gasser, you can make it start gassing within just 20 seconds by shaking the contents of the bottle up and down real hard for a few seconds, after you do that, hold the gasser bottle up to a light and gently press on the bottle, you will see a huge puff of gas exit the bottle, it will be able to do this for about a good 5 minutes or more every time you press on the bottle....super huge puffs of gas will exit the bottle each time it is squeezed. If you see at any time (say 3 minutes) into the gassing, that you need more huge puffs of gas, simply shake the contents of the bottle up and down about 4 times, and once again it will puff dragon for several more minutes.
4. When done gassing (the bottle will be slighty warm to the touch still) screw the barb off the bottle, put the bottle under a sink faucet, have the faucet put out a skinny slow stream of water that will flow into the bottle's opening (once the barb is screwed off) and fill the bottle up to the top with cold water to stop the reaction from producing gas inside the bottle. Then simply walk the full bottle to the nearest toilet and empty the used contents of the bottle into it....flush the toilet....reuse the empty bottle, the same bottle can be used over and over for years.
5. There is absolutely no need to create a drying tube chamber in the wand with extra calcium chloride, absolutely none! This process can be dreamed countless times without a drying tube and each and every time the gas will come out 100% dry! don't be fooled into thinking you need an extra drying chamber, you don't need one, the ghetto gasser expels super dry gas each and every time AS IS. You need to remember that when the gas exits the tube and hits the humidity in the air, you will be able "to see the gas", otherwise it would be invisible to the naked eye. Plus there is no need to use a pump style insect killer container or anything elaborate like that as I've seen someone assemble, keep it simple, this back to basics ghetto gasser works 100% fine as is, breaks down when done in less than a minute, and the bottle is re-usable forever.
6. Remember to dispose of the contents of the container into a toilet within a 30 minute period, simply turn the bottle upside down and all the contents will pour out with ease...because if you wait longer than this, the rocks in the bottom of the container will harden into a single globule mass, making it impossible to get the rocks out of the bottle. If you forget to dispose of the contents within 1/2 hour, then you will have no choice but to throw the entire used bottle away.
PART II
treatment of gassed crystals
A special note on the treatment of xtals that result from gassing:
1) after you have gassed your solvent and all the crystals have rained out to the bottom, typically after 1/2 hour of it sitting in the freezer with the lid on,
2) then pour the post-gassed solvent thru a #103 filter disc situated inside a buchner cup, be sure to pre-wet the filter disc sitting in the cup with a bit of cold dry acetone, pour the post-gassed solvent thru the filter disc in the cup with vacuum applied first, by applying the vacuum first, you will assure that no xtals will sneak in thru crevices or air pockets in between the round filter disc and the cup. anyhow, you can use a really cheap one hundred dollar vacuum pump from one of those chinese freight outlets, those work great for a cheap vacuum source for your buchner cup.
3) so now all your hcl xtals are sitting on the filter disc in the cup
4) now rinse the xtals x 3 times with liberal amounts of cold dry acetone
5) now continue to apply vacuum for 2 minutes to air dry the xtals on the filter
6) once the xtals have dried in the cup on the filter, then scrape them off with a razor blade into a pyrex dish
7) now take a pile of the xtals and dump them into a mortar and pestal, then add just enough cold dry acetone to barely cover the xtals, now pestal the xtals round and round for at least 3 minutes, this will clean the xtals very well, almost as well as a rextallization, except that this involves manual labor.
8. now take the contents of the mortar and pestal and pour it thru a new 103 filter disc in a buchner cup with vacuum applied first, rinse the mortar and pestal out three times with small amounts of cold dry acetone, pouring the rinsed contents thru the filter on the vacuum setup to help rinse the xtals that are allready there, this reclaims any lost xtals that are still sitting in the mortar and pestal as well. now continue to apply vacuum until all the xtals on the filter disc are air dried
9) now use a razor blade to scrape off the cleaned xtals from off the filter disc into a pyrex brownie dish
10) Now this is very important !!! no matter how clean you think your xtals are after all the mortar and pestalling, they still contain solvent residue from the xylol or toluene, the ONLY way (besides recrystallization) to get rid of this solvent crap is to now dissolve all your clean xtals in about 30 to 50ml of warm (about 160 degree F) distilled water. simply add all your mortar and pestalled clean xtals to a brownie dish, spread them out, now pour 30 to 50ml of distilled water only (hot is good) onto the xtals, they will dissolve into the water.
11) now point a clean fan on the hi setting at your brownie dish on an even surface, allow several hours for the fan to evaporate off the water....the xylene or tolly will form an AZETROPE with the water in the dish, and will evaporate off into the air, leaving behind 100 percent totally clean xtals in the dish to scrape up after all the water has evaported off.
12) you MUST do step number 10 above, the trick of adding all your xtals to a small amount of warm distilled water....then evaporate off the water....this is the only way to get totally clean xtals...all these steps are just as effective as doing a rextallization, here we are rextallizing the xtals from water while at the same time the fan is causing the xylol and tolly residue to evaporate into the air with the water....this is the only way to get rid of that xylene or tolly taste that will not go away no matter how much mortar and pestalling you will do....you must do the water trick step....if you don't the tolly or xylene residue trapped inside the xtals will take away from the experience , and can cause side effects like head buzzing, slight confusion, agitation, anxiety, etc. but by doing the water trick, all side effects are eliminated, can't stress enough how important this is. the xtals after you scrape them up from the brownie dish will have absolutely no solvent residue taste what so ever, and only taste super bitter like they are supposed to, when you take the water evaporated xtals as compared to just mortar and pestalled xtals, the difference is like night and day....the experience is super clean and the xtals reach the brain with maximum impact as there is no solvent residue on them to weigh them down or skew the effects.
13) You will be able to minimize the losses due to acetone mortar and pestalling by going back and scraping off all the excess left behind powdered yield from off the pestal and off the mortar back into the pyrex dish with scraping using a downward motion with a razor, typical loss was only 50mg, for example, 1000mg can be mortar and pestal cleaned, and you should always get back about 950mg or so, so just always scrape the left over powder off the pestal or from inside the mortar back into your pile, also when the acetone rinse jar is checked on after several days, there should be a layer of re-claimed xtals at the bottom, leaving the jar in the freezer for 7 days will reclaim the total amount of lost xtals. recommend cleaning only 1 gram amounts in the mortar and pestal at a time as it allows for better cleaning and no splashing.
14) when you are done with everything, add a splash of hot distilled water to your mortar and pestal, this will reclaim any trivial amounts of powder left behind that could not be scraped out. The crystals will instantly dissolve into the water. Then pour off the water into a small brownie dish, evaporate off the water to reclaim any left over yield.
---------------------------------------------------
* special notes:
* you will notice that when you typically mortar and pestal an amount of say 1 grams of xtals, that you will only get about 950 mg of the xtals back super clean, just remember to save all your yellow/brownish acetone rinses and put them in the freezer for 7 total days, at the end of that time, all of your "lost" xtals will reappear in the bottom of your acetone rinse jar.....this doesn't happen overnight, it takes about a week: just simply pour the contents of your acetone rinse jar thru a 103 filter with vacuum applied to reclaim your lost xtals, you will get alot of them back, just rinse them with acetone x 3 times, then after they are dry, add them to 30ml of warm distilled water all in a pyrex dish, point fan at dish for several hours, and after the water has evaporated off, then scrape up your 100 percent clean xtals with absolutely no solvent residue what so ever.
* to make "dry acetone" this is what you do: spread a thin layer of epson salts onto a pizza pan, place in the oven at 400 degree F for 2 hours, then pull pan out of oven, scrape up your now dried salts with a spatula and put them into a sealed mason jar, they will keep forever dry this way.
* now add about a handful of the dry salts to a jar full of acetone, shake it up for 1 minute every 10 minutes for 30 minutes, then put the jar into the fridge, after several hours, the acetone will turn clear again as all the salts will have fallen to the bottom, use the acetone out of the jar as is by using a long glass pipette to suction the now super dry acetone from on top the rocks in the jar....now just use your pipette to drop the cold dry acetone into your mortar and pestal to just barely cover your pile of xtals so that they can be cleaned or pestaled for several minutes in the mortar.
* it doesn't matter if you use cold dry acetone from the fridge, or from the freezer, they will both cause exactly the same amount of loss of product when cleaning, just make sure it is at least fridge cold, but don't forget to save all your dirty acetone rinses in the freezer for 7 days, cause at the end of that time, all your lost xtals will have fallen out of the acetone wash jar in the freezer and formed a thick layer of clean xtals at the bottom, reclaim them!
If anyone get's anything out of this post, it's that mortar and pestalling post-gassed xtals in acetone is not enough, you got it take it one step further and then throw those xtals into a small volume (say 30ml) of distilled water, then evaporate off the water, then scrape up the recrystallized from water shardy looking 100% clean xtals, for some reason xylol and tolly residue likes to imbed itself into the crystal matrix, and the only way to free it is to dissolve the post washed xtals in distilled water to allow it to seperate out and form an azetrope with the water so that it evaporates off....you can mortar and pestal tell the cows come home, but it still wont eliminate the last traces of tolly or xylol from your imbeded crystal matrix. You must do the very last water evaporation trick to get 100% clean xtals with the best experience, bar none.
the difference in the experience produced by the water recrystallized hcl crystals is x 10 better experience, ...all because the xtals reach the brain with maximum effect, locking into those receptors properly., only the bitter taste of the crystals are noticeable, no solvent residue taste what so ever.
PART III
SAFETY CONSIDERATIONS:
THIS IS EXTREMELY IMPORTANT: When preparing the gassing bottle and when using this tek during the gassing stage, You must wear a gas mask for safety reasons....get one from any hardware store...they are about $30 to $40 or so, they filter hcl gas, paint fumes, formaldehyde, etc. Read the label to make sure it is capable of filtering out muriatic gas/fumes...it will say so on the box.
DO NOT PROCEED WITHOUT READING THE FOLLOWING VERY CAREFULLY:
The procedure described below is potentially very hazardous. It uses anhydrous hydrogen chloride gas to salt hcl crystals out of an aqueous solution. Hydrogen chloride gas is an extremely noxious and potentially deadly compound. The procedures described herein are safe as written, however, accidents are possible. Do not even think about dreaming this method without first securing a suitable gas mask or organic vapor mask capable of filtering hydrogen chloride fumes. Learn how to use the mask ahead of time and wear it at all times while the apparatus described is in operation. Work only in well ventilated areas. Do not attempt this dream in a house where children or invalids are present. Failure to follow all safety precautions can result in serious personal injury or death.
Hydrogen chloride gas is serious business. If you are unable or unwilling to follow the safety precautions, then you would be better off not dreaming this method.
All that being said, believe the device shown below to be quite safe. It produces only small amounts of the gas as needed and anyone who can follow directions and has common sense can safely produce beautiful results in dreams with this method.
HCL gas is dangerous. Do not breath it. This gasser produces small amounts of gas on demand by squeezing but you still must do this outside (still wearing your gas mask) or use it inside a fume hood. HCL gas will corrode metal stuff on contact, so keep it inside your fume hood. You must wear safety goggles, gloves, pants, and of course, the gas mask at all times when preparing the bottle and using it. But don't worry it is completely safe...this is even easier then the standard titration imho...It's very easy to put together and use.
PART IV
Construction of the fume hood:
Materials needed:
#1) 110 Liter sterlite or rubbermaid container
#2) six 115VAC 65CFM brushless computer cooling fans (4.7 x 4.7 x 1.5")
#3) AC cord
#4) soldering iron and solder or can use electrical tape or screw nuts
#5) 6-32 or 8-32 bolts, nuts & washers for mounting the fans
#6) drill circle tool with blade
#7) ruler and marker
#8) drill & drill bits
TIP: Forward and reverse the drill when you are using the drill circle cutting tool to quickly cut out a circle section for each motor--when you fwd & reverse the drill, swim found it cuts through the plastic faster.
Fume hood construction & operation shown below.

 )
)
 :oThank,s