Author Topic: Pressure vessel construction  (Read 164 times)

Douchermann

  • Dominant Queen
  • ****
  • Posts: 397
Pressure vessel construction
« on: July 11, 2009, 06:29:31 AM »
Hey guys, I've been working on constructing a pressure vessel.  I went to walmart to see what they had as far as coolers (cylindrical beverage coolers), and came up with the 1/2gal "Bubba keg". 

http://www.recarda.co.uk/images_products/59.jpg
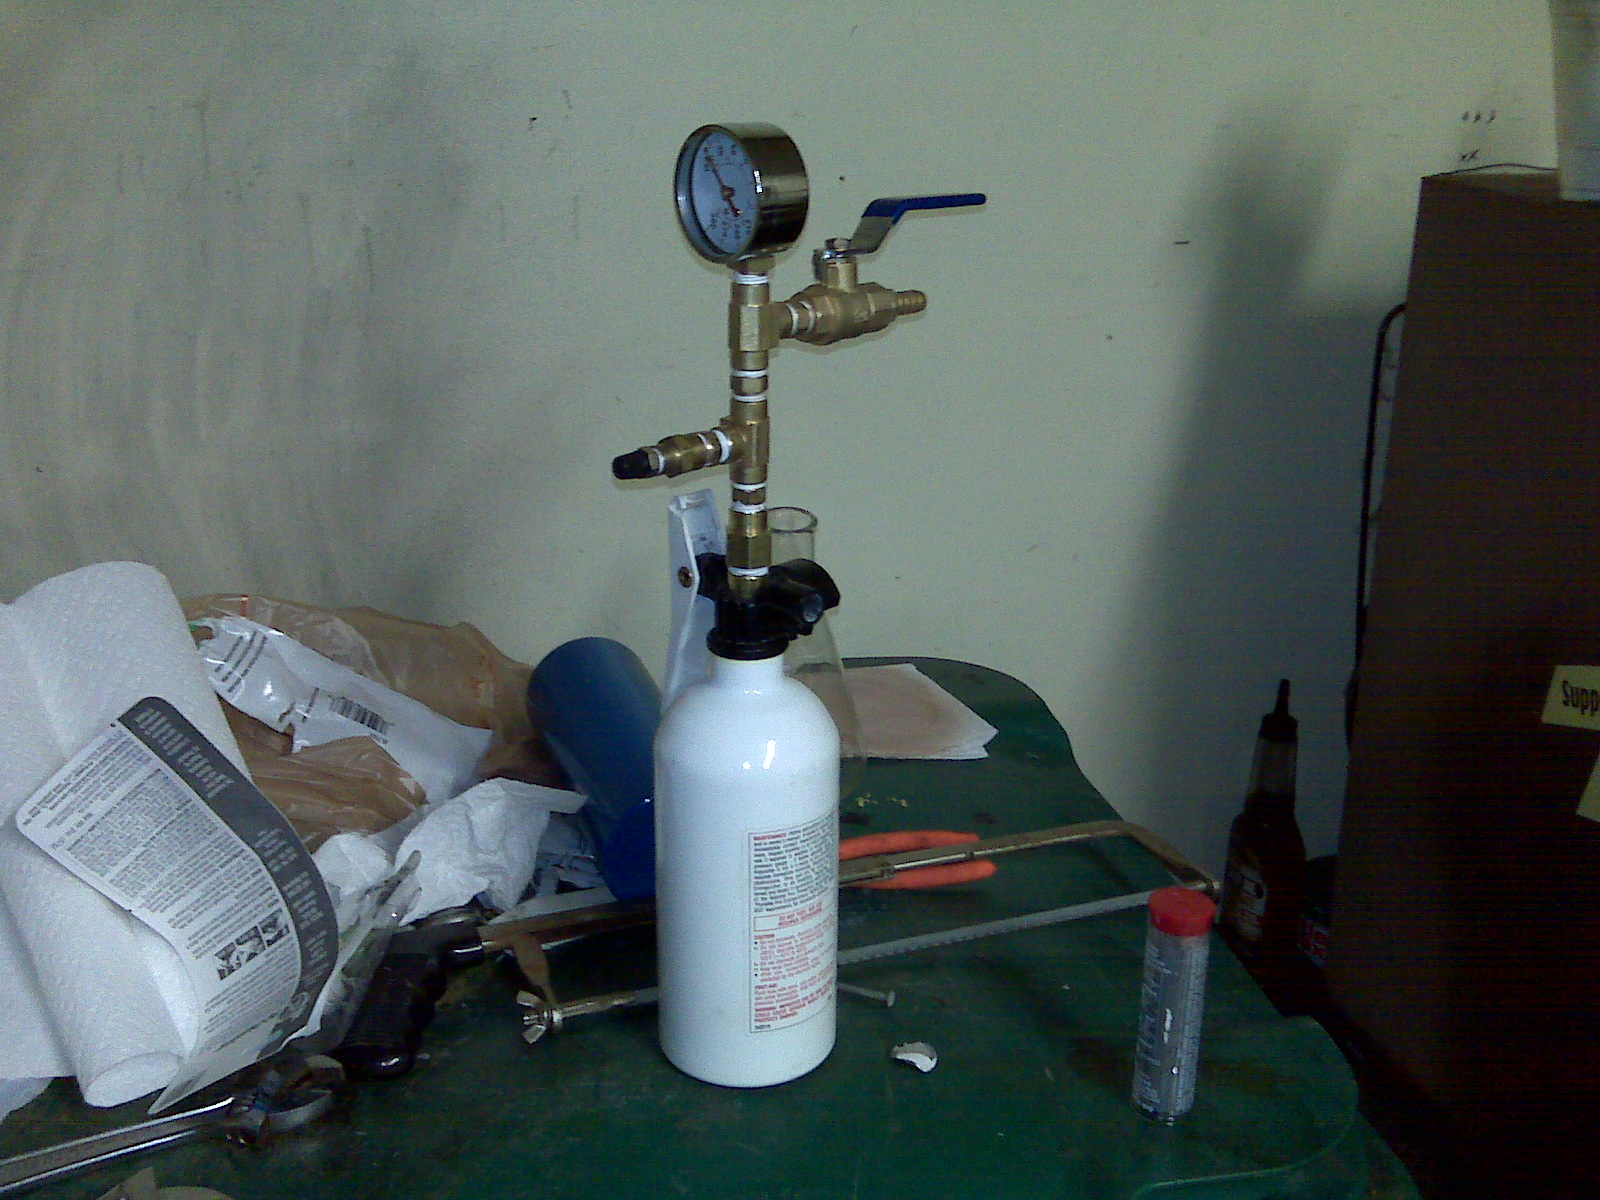
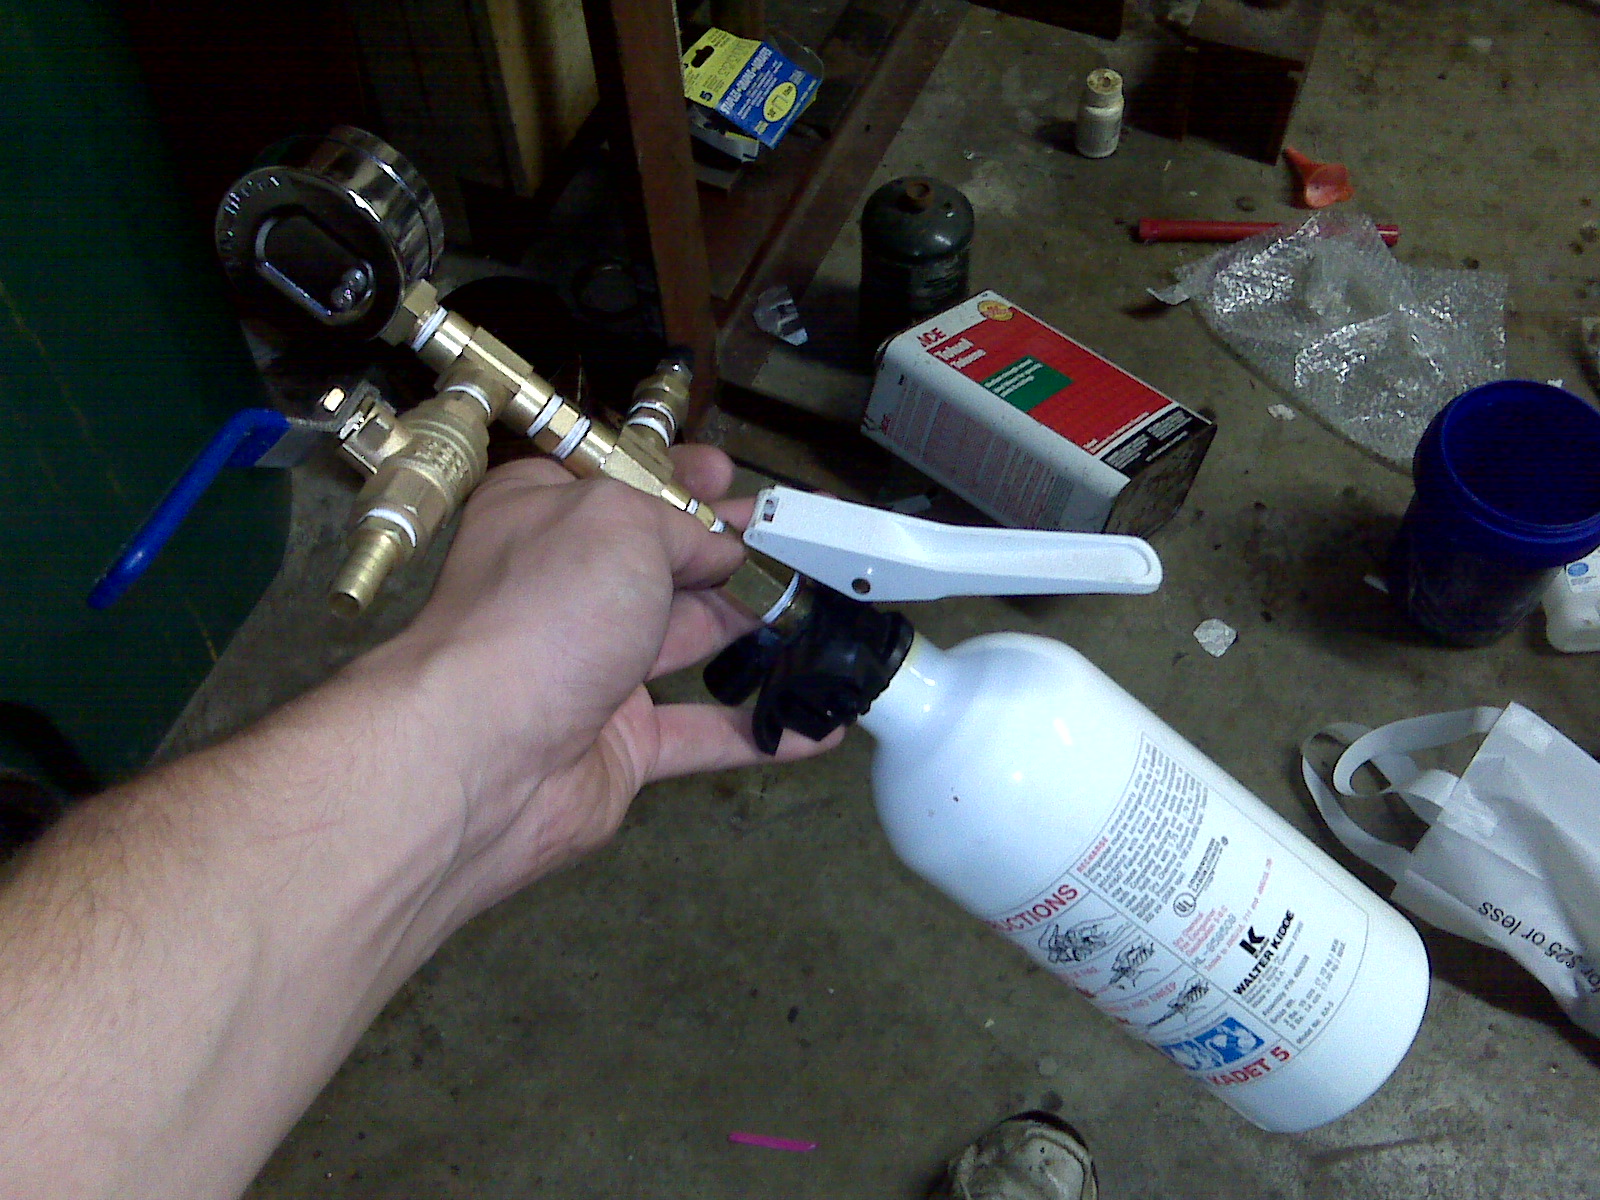
The high points of this were it's manageable volume (~2L), the fact that it only had one hole, instead of a lower pour spout, and it's [relatively] thick construction.

Without modification, other than attaching my brass manifold, I was able to pull almost full vacuum.  The gaskets wouldn't allow it all the way to full, but I'm sure it would have taken that.  However, upon pressurizing, it didn't take more than a couple psi before the plastic threads let loose.  I fiberglassed the outside with one solid layer, and the inside of the lid to seal all holes.  After it dried, I bought 'hanging tape' which is sorta like a roll of sheet metal the width of scotch tape.  I attempted to fasten down the lid with this, but it was clear that this wouldn't work too well immediately after bolting it together.  However, it did hold up to about 10psi with hissing, and at 15psi it blew the lid out enough to let off all the pressure.  Tomorrow I'll run back to the hardware store and see if I can buy 6 of their cheapest smallest C-clamps and see what I can do with that.

The plastic of this should hold up to the solvents I throw in it.  What I am worried about is the fact that stir bars tend to wear holes in the bottom of plastic containers.  I bought a wide mouth container so that if I do notice wear, I can throw a layer of fiberglass on the inside to combat this.  My goal is 100psi without blowing, but it will be kept around 60-90 (4-6atm) for most reactions. 

Anyone have any input or ridicule? Clearly, the greatest flaw in the design is the large surface area of the lid.  This will cause a greater force to be exerted on the sealing surface (and thus more counter-force required to keep it sealed).  However, the convenience of this vessel is enough for me to keep trying.

heisenberg

  • Dominant Queen
  • ****
  • Posts: 268
Re: Pressure vessel construction
« Reply #1 on: July 11, 2009, 08:28:44 AM »
IIRC, PVC is rated to 65 PSI. Although I happen to have first hand knowledge that it will hold until 98. If this doesn't work, then perhaps you could try cementing something out of pipe.

My concerns with the cooler would not only be with the threads, but with the plastic itself. Those walmart cooler things tend to be made out of pretty cheap plastic, and are prone to shattering.
I spent all my money on booze and hookers, the rest I wasted - Charles Bukowski

Vesp

  • Administrator
  • Foundress Queen
  • *****
  • Posts: 3,130
Re: Pressure vessel construction
« Reply #2 on: July 12, 2009, 08:33:32 AM »
Why not use a modified fire extinguisher or perhaps some large metal pipes?

I'd go with the pipe, or a pop bottle, they can hold more then 15PSI pressure wise, though I don't know how well the solvents would resist the container and.. vice versa.
Bitcoin address: 1FVrHdXJBr6Z9uhtiQKy4g7c7yHtGKjyLy

Douchermann

  • Dominant Queen
  • ****
  • Posts: 397
Re: Pressure vessel construction
« Reply #3 on: July 12, 2009, 03:52:37 PM »
One of the structural supports on the top of the lid managed to blow out.  It cracked when I put the C-clamps on there, so I said screw it to the plastic beverage cooler idea.  Next is PVC like heisenberg suggested.  They'll hold well over 65psi if you get the good stuff.  I made a PVC golfball launcher for my drafting and design class and I pressurized that thing to about 100psi hahaha.  The fire extinguisher will work for  hydrogenations, but for the reaction I'm looking to perform, the aluminum would react with the catalyst, so will steel.  For the fire extinguisher to work, I'd have to coat the inside with something. 

The alcohol solvents shouldn't cause any problem with the PVC, but what about any ketones that manage to form.  I would never ever use this to produce illicit substances... but what if a certain ketone managed to form... would it affect the vessel at all? Would the vessel affect yeilds?

heisenberg

  • Dominant Queen
  • ****
  • Posts: 268
Re: Pressure vessel construction
« Reply #4 on: July 12, 2009, 04:24:43 PM »
If you could find it, you could epoxy in teflon sheet on the inside of the vessel. That would probably eliminate most of the reactivity problems.
I spent all my money on booze and hookers, the rest I wasted - Charles Bukowski

v16

  • Subordinate Wasp
  • ***
  • Posts: 157
Re: Pressure vessel construction
« Reply #5 on: July 12, 2009, 10:17:16 PM »
There are lots of liquid tank sealing systems out there.  I have had luck using the ones made for gas tanks, but you need to pick the right type of polymer for your reaction.  The nice part of the systems is you can always retreat the tank after a few runs...


Douchermann

  • Dominant Queen
  • ****
  • Posts: 397
Re: Pressure vessel construction
« Reply #6 on: July 16, 2009, 06:56:15 AM »
This is the type of fire-extinguisher I mentioned in my methylamine thread.  With no sealant on the 4" brass pipe through the neck, it bled off ~15psi over 1.5hr, starting at 60psi.  We'll see how it does now that I've put some epoxy on the pipe.  It's hard to tell, but the black plastic is actually the nozzle of the fire extinguisher, I just sodomized it with a drill and a dremel.  The threads on the tank are no where near standard, so I had to work with what I could.  The tank says it's been tested to 300psi, and fire extinguishers are normally pressurized to 100psi, so I feel completely safe running at sub-100psi pressures. 

To make it, I just disassembled the nozzle portion of the extinguisher, and first jammed a 1/2" drill bit through it.  I would have jammed a 5/8" bit next, but I bought the wrong chuck size, so I just made due with a 5/8" paddle bit (wood boring) and the dremel - worked well enough.  I cut off unnecessary plastic around the top then after some enlarging of the hole, jammed a 3/8" brass pipe through it.  The top, I placed a reducer to 1/4" since that's what my manifold is based off.  The bottom just has a double female 3/8" pipe coupler.  As for the manifold, I would have condensed it more, but no one has 4-way brass adapters at 1/4" so I made due with the 'tee's.  It has a pressure gauge on top, a vacuum take-off preceded by a ball valve, and a standard schrader valve.  For those who don't know, a shrader valve is the type of valve that is used on tires.  I might change this with a quick disconnect type fitting.  That way, I could just set the gas regulator at a certain PSI and leave. 

The beautiful thing about the sodomized black plastic part, is that the threads are all universal on kiddie brand fire extinguishers of similar duty.  If I wanted to upgrade to a larger size, I just have to find an empty fire extinguisher... that or just add the 'empty' adjective to an extinguisher.  The tank volume is ~820ml so a 500ml reaction should leave enough headspace.  Stirring isn't a problem so far, and tomorrow I will be coating the inside with the same rust-proofing polymer that I used on my car floor pans.

Sedit

  • Global Moderator
  • Foundress Queen
  • *****
  • Posts: 2,099
Re: Pressure vessel construction
« Reply #7 on: July 16, 2009, 01:58:39 PM »
Pretty cool Doucher. I use to use fire extinguisher for "steam distillers" just loading them up with plant material and had an attachment to go to the condenser. Worked better then anything I have made yet also.

Are you going to make this into a Parr shaker hydronator? It could save alot of money as opposed to buying one. They are also placed on the watch list with pill presses so I would not attempt to buy one even if I could.

By the way the on the tanks I have are written on them "Tested at 586 PSI" so these things can take some abuse but I would be careful when heating is involved as it would be hard to tell how much the rating on it droped as the temperature went up.
There once were some bees and you took all there stuff!
You pissed off the wasp now enough is enough!!!

Douchermann

  • Dominant Queen
  • ****
  • Posts: 397
Re: Pressure vessel construction
« Reply #8 on: July 16, 2009, 06:43:47 PM »
It might just be a stirred hydrogenator.  I'll also be using it for catalytic oxidations though, so it's not limited to hydrogen.  As a matter of fact, it's first test will be a catalytic oxidation, I'll likely post results in that one place.
« Last Edit: July 16, 2009, 10:22:58 PM by Vesp »

Douchermann

  • Dominant Queen
  • ****
  • Posts: 397
Re: Pressure vessel construction
« Reply #9 on: July 28, 2009, 08:14:29 PM »
Well, I managed to screw up the coating on the inside.  I coated the inside completely, so a solution of CuCl2 did not react with the aluminum, however, too much dripped down onto the bottom.  The paint requires oxygen to cure, and because of the bottles design, it doesn't allow fresh air to freely move through it, so it dripped down to the bottom and dried at an angle, so my stir bar no longer rotates effectively.  I bought a cheap nalgene bottle that I'll try to use for one or two runs before I buy another fire extinguisher and re-coat. 

Vesp

  • Administrator
  • Foundress Queen
  • *****
  • Posts: 3,130
Re: Pressure vessel construction
« Reply #10 on: July 29, 2009, 03:24:15 AM »
And of course, be sure to tilt it on its side, rather that then the bottom, eh?
Bitcoin address: 1FVrHdXJBr6Z9uhtiQKy4g7c7yHtGKjyLy

Douchermann

  • Dominant Queen
  • ****
  • Posts: 397
Re: Pressure vessel construction
« Reply #11 on: July 29, 2009, 07:21:22 AM »
Yep, that's what I will be doing.  I already prepped a new fire extinguisher, found another small one :).  Coating tomorrow, once I put my car back together haha.

Douchermann

  • Dominant Queen
  • ****
  • Posts: 397
Re: Pressure vessel construction
« Reply #12 on: August 05, 2009, 04:57:01 AM »
Well, bad news.  Under pressurized oxygen, heat, and methanol, the coating managed to soften to the point where the CuCl2 could work its way under.  Fortunately, there was only 5g in the mixture so it didn't dissolve (and thus weaken) the fire extinguisher.  Back to plastics I suppose.

v16

  • Subordinate Wasp
  • ***
  • Posts: 157
Re: Pressure vessel construction
« Reply #13 on: August 05, 2009, 09:09:05 AM »
what coating did you use?  I think you might need to try a different one. 

Douchermann

  • Dominant Queen
  • ****
  • Posts: 397
Re: Pressure vessel construction
« Reply #14 on: August 06, 2009, 07:54:55 PM »
It was POR-15 which I used for my restoration on my car.  I have found a much more suitable vessel.  A reverse osmosis sediment filter canister - rated to 125psi, widemouth lid, polypropylene construction with 3/16" thick walls.  The top already has two 3/4" NPT openings.  I havn't measured the volume yet, but I assume it to be around 1L total.  Right now, my stir bar is too big so it doesn't create a large enough vortex so I'm limited to smaller volumes.

Sedit

  • Global Moderator
  • Foundress Queen
  • *****
  • Posts: 2,099
Re: Pressure vessel construction
« Reply #15 on: August 06, 2009, 08:07:46 PM »
Have anyone considered having the inside of the container powder coated? They use an electrical charge to pull all the particals to the surface of the material then fire it in an oven forming a hard glass like coating. My sister in laws father use to run a company that did this and the coatings are very resistant to acids/bases heat ect... Various formulas can also be worked out.
There once were some bees and you took all there stuff!
You pissed off the wasp now enough is enough!!!

Douchermann

  • Dominant Queen
  • ****
  • Posts: 397
Re: Pressure vessel construction
« Reply #16 on: August 07, 2009, 07:59:29 PM »
I have considered it, and was going to result to that until I remembered about RO units.  

Good news!
I had my first successful pressurized chemical reaction yesterday.  I'm doing the work-up as I type this.  I will be posting the actual results, so look towards that.  The pressure vessel (RO sediment filter canister) shows no damage or wear from the 9hr run under 60psi and constant stirring.  
« Last Edit: August 07, 2009, 10:23:26 PM by Vesp »